Celtic query

Signed-In Members Don't See This Ad

jwhiting

Member
Joined
Nov 22, 2019
Messages
17
Location
Sun City, AZ
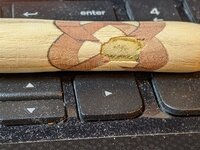
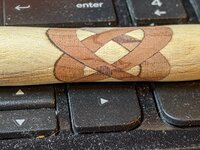
Hello - I'm a new pen turner, trying my first Celtic knots. I'm sorry if I'm posting incorrectly (wrong thread, etc.). This is my second knot (second fail, too), and I'm seeking diagnostic help. In both pens I ran out of blank and reached the tube before the knot "joined". The attached two pics are of the same blank, and show one side where the knot joined and the opposite side where it did not. My guess is that the tube is not exactly centered in the blank or perhaps the blank was not exactly square. Can anyone confirm either guess or offer another explanation?
 

Attachments

  • Did not join.jpg
    Did not join.jpg
    455.1 KB · Views: 197
  • Joined portion.jpg
    Joined portion.jpg
    483.5 KB · Views: 194
Signed-In Members Don't See This Ad
1. the blanks need to be perfect square.

2. entrance point and exit points need to be perfectly centered, and it is not impossible, just a little practice and experience.

3. The sanding scratches can easily be seen; back off the sanding grit to a higher number and reduce the low end numbers. A very sharp tool, skew, scraper, carbide insert can bring to size or near size to the point that only 400 - or 600 sandpaper is needed. But on segments, a very sharp tool is your friend and will eliminate the need for SandPaper and SP scratches, as well as sanding dust contaminating segments of different colors. Repeating: Sharp tools make for very smooth finish without the need for SP.

4. for some reason, it seems you probably used a mandrel. The one sided sand through is often a result of bent mandrel, too much pressure in sanding or pressure from a dull tool, or tail stock off center. It could be that it was drilled off center.
 
I believe both Hank and Ken together hit on all aspects. The thing is not enough info was given to us to properly diagnose your method because you did not give it. As mentioned a square blank is the utmost start. Then the easiest way to make a knot is to not cut all the way through. Leaving about 1/16" to 3/32" material. This leaves lining up the pieces a no brainer. But again more important info is you need to match exactly or just a shade under the thickness of the kerf of your blade you are using and from the looks you are using a 1/8" blade. This works but there are 3/32" blades that look better. Now when gluing the infill material if it is the correct thickness then when clamping there is no bulging or no caving in of the 2 pieces and this is perfect. You square the blank again making sure you do not sand it down any. Just clean up the overhang of infill or glue.

OK after you get all the cuts done and let it set up it is time to drill the tube. Here again as mentioned this needs to be accurate and dead center for the knot to look good. You need to find the center of the design and not the center of the blank. But if you did everything correctly and the blank remained square this should be the center of the blank. Here is where drilling on the lathe shines. Use a center drill to start hole and then switch to the proper sized bit. Do not go over size or else this will throw the tube off center and throw the knot off. Good luck to can do it.
 
Sorry Jim, I can't help. But on a positive note, that's one beautiful looking Celtic Knot, I wish it had turned out and I hope you can find the answer to your question.
Thank you very much for your positive comment and response. I think it's a good start, but obviously there is a long way to go!
 
Your infill needs to be all the way through the blank or at least almost all the way through, to make gluing easier. Looks to me like you just didn't go deep enough. Celtic knots are one design that requires a perfectly centered hole.


Sent from my iPad using Penturners.org mobile app
Thank you - I cut the blank to 1/8" short of all the way through for each infill piece. I'm planning on trying one cut all the way through, but I foresee some difficulties in getting it aligned well enough during the gluing process.
 
1. the blanks need to be perfect square.

2. entrance point and exit points need to be perfectly centered, and it is not impossible, just a little practice and experience.

3. The sanding scratches can easily be seen; back off the sanding grit to a higher number and reduce the low end numbers. A very sharp tool, skew, scraper, carbide insert can bring to size or near size to the point that only 400 - or 600 sandpaper is needed. But on segments, a very sharp tool is your friend and will eliminate the need for SandPaper and SP scratches, as well as sanding dust contaminating segments of different colors. Repeating: Sharp tools make for very smooth finish without the need for SP.

4. for some reason, it seems you probably used a mandrel. The one sided sand through is often a result of bent mandrel, too much pressure in sanding or pressure from a dull tool, or tail stock off center. It could be that it was drilled off center.
Thank you for your time in creating such an organized reply! I can see the importance of 1. and 2. and I'll keep trying. #3 is right on, I'm sure the scratches reflect the 60 grit paper I was using trying to get the knot segments to "close". I was taken aback when on the one side they never did close - the tube showed up!! Lack of patience on my part for sure - I was determined to keep going until the knot segments met. 4. - yes, I was using a mandrel with a mandrel-saver. I will be mindful going forward about too much pressure.
 
I believe both Hank and Ken together hit on all aspects. The thing is not enough info was given to us to properly diagnose your method because you did not give it. As mentioned a square blank is the utmost start. Then the easiest way to make a knot is to not cut all the way through. Leaving about 1/16" to 3/32" material. This leaves lining up the pieces a no brainer. But again more important info is you need to match exactly or just a shade under the thickness of the kerf of your blade you are using and from the looks you are using a 1/8" blade. This works but there are 3/32" blades that look better. Now when gluing the infill material if it is the correct thickness then when clamping there is no bulging or no caving in of the 2 pieces and this is perfect. You square the blank again making sure you do not sand it down any. Just clean up the overhang of infill or glue.

OK after you get all the cuts done and let it set up it is time to drill the tube. Here again as mentioned this needs to be accurate and dead center for the knot to look good. You need to find the center of the design and not the center of the blank. But if you did everything correctly and the blank remained square this should be the center of the blank. Here is where drilling on the lathe shines. Use a center drill to start hole and then switch to the proper sized bit. Do not go over size or else this will throw the tube off center and throw the knot off. Good luck to can do it.
Thanks, John, for your encouraging reply! I squared the blank on the bandsaw before I started, then set up a jig on the table saw and cut each 60 degree slice to 1/8" to the edge. I matched each slice of the infill width to sawblade kerf, then used 5 minute epoxy to glue them in. I tried very hard to trim the overhangs off with the bandsaw, then sanded just smooth, trying to keep the blank square before drilling. I drilled on the drill press and also tried to center the hole carefully, but it wasn't perfect. the hole was very slightly off center (but both ends were the same, so the hole was the same relative to center at each end. I would guess maybe 1/32nd off perfect center). Next one I do I will try to drill on the lathe.
 
Hi Jim,

Thank you for posting this question. The responses from Ken, Hank, and John will help us all be better pen turners. Good luck. I can't wait to see your finished product.
 
Thank you - I cut the blank to 1/8" short of all the way through for each infill piece. I'm planning on trying one cut all the way through, but I foresee some difficulties in getting it aligned well enough during the gluing process.

You really wont be helping yourself by cutting all the way through. Some designs with Celtic knots do require a full cut through, but simple ones do not. I try to leave about a 32nd. Very important, as John said that the infill fills the kerf perfectly. If you can slide the infill in easily, yet turn it upside down and it doesn't fall out, that is perfect. You never really want to clamp it either, that will open up gaps. If you have to clamp it, your infill is too thin.


Sent from my iPhone using Penturners.org mobile app
 
You will find it easier to do with a fatter blank. I usually cut to 1/16" on a smaller cross section. Looks like you ran out of inlay before it got to finished size. Its also possible to build a sled for the bandsaw to make angled cuts, the thinner loops look good and can be overlaid with parallel cuts for more complex looking celtics.
 
You don't mention the size of your blank. Doing a Celtic knot requires a larger blank.
If you use a 3/4" blank, then cut it leaving 1/8". You are essentially making the usable portion in the middle 1/2", which is very small for most kits other than slims.
When you say getting the knot to join, what you are really looking at is the wood that you left when you cut the kerf.
Try doing a knot using a 1" blank to start. It will mean a little more waste, but it will be more forgiving until you get some practice.
 
You will find it easier to do with a fatter blank. I usually cut to 1/16" on a smaller cross section. Looks like you ran out of inlay before it got to finished size. Its also possible to build a sled for the bandsaw to make angled cuts, the thinner loops look good and can be overlaid with parallel cuts for more complex looking celtics.
Hi Gary, and thanks for your response. "Ran out of inlay..." is exactly what happened, plus, I think my epoxy of the tube into the blank might have been a little thin as well, letting me, essentially, sand away the very last layer.

You kind of lost me on that last comment, though, "can be overlaid with parallel cuts" - can you clarify that a little? It sounds interesting.
 
You don't mention the size of your blank. Doing a Celtic knot requires a larger blank.
If you use a 3/4" blank, then cut it leaving 1/8". You are essentially making the usable portion in the middle 1/2", which is very small for most kits other than slims.
When you say getting the knot to join, what you are really looking at is the wood that you left when you cut the kerf.
Try doing a knot using a 1" blank to start. It will mean a little more waste, but it will be more forgiving until you get some practice.
Thanks, Darrin - that is very interesting and I found that comment "essentially making the usable portion in the middle 1/2" very clarifying. That was very close to an aha for me. Further to that, do you think that perhaps cutting the angles for the infills at 60 degrees (instead of say, 45 degrees) also added to the problem? I'm just trying to understand the dynamics of all these moving parts (interacting changeable options) on the knot relative to where it winds up in the finished blank.
 
Hi Gary, and thanks for your response. "Ran out of inlay..." is exactly what happened, plus, I think my epoxy of the tube into the blank might have been a little thin as well, letting me, essentially, sand away the very last layer.

You kind of lost me on that last comment, though, "can be overlaid with parallel cuts" - can you clarify that a little? It sounds interesting.
All that takes is moving your stop a bit and cutting a new set of inlays at the new position.
C29A89F4-F3B7-409F-B5F4-07E1EF25BA7B.jpeg
 
Back
Top Bottom