casting pinecones

Signed-In Members Don't See This Ad

elody21

Member
Joined
Dec 30, 2004
Messages
1,596
I tried casting my mini pine cones finally.
They were dried for 24 hours in a 200 degree oven before Christmas. The other day I put them in the oven again at 200 for probably 8 hours just to make sure they had not absorbed any moisture since Dec.
I followed all the directions and put them in my pressure pot at 40 for an hour.
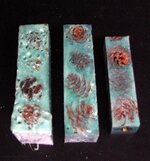
I am not sure yet how they will look once turned but the blanks ended up with a lot of air bubbles on the top and so far when I trimmed the blank there are air bubbles further in.
Photo posted
So what went wrong?
Is my tiny compressor not enough? It took at least 10 minutes to come up to 40 and then ran for the entire hour. so for most of the hour it stayed at 40. I have had problems with my pressure pot since I bought it at harbor freight. I know there is a leak but I can't find it.

Should I have held each pine cone and poured the aluminite in between the spaces before putting it in the mold?

Should the mold and aluminite be warm?

OR is this what it is supposed to look like. You cant see some of the air bubbles in the photo
I am waiting for the tube to dry in the blank.
who knows maybe it will be fine?
Alice
 

Attachments

  • pine cone.jpg
    pine cone.jpg
    289.5 KB · Views: 668
Last edited:
Signed-In Members Don't See This Ad
Rub soapy water or kid's bubble solution on every joint of your tank while under pressure. This will help you find the leak.

Fix the leaks and try again.
 
Thanks about the soapy water. I will try that
But about the blanks. I am in the middle of turning the first one. I am not down to the bushings yet. Does anyone use thin CA glue at this point to saturate the pine cones?
Should the pine cones be stabilized first before casting? If so with what?
There is still spaces. So I first put thin and then before it dried used med. to hopefully fill the spaces.
I think I can save this first one.
Another question.
I have the special aluminite dye. When I used the green it turned out more blue than green. Any one have this problem?
I ended up adding a lot of pearl to the mix to change the color. I wanted dk blue and green and you can see the color I ended up with. Ahhh!!!
 
The first one looks like gooey bubbles, if so it is an indication of moisture still in the cones.

If still sticky post cure them in the oven until hard (after cooling). Once hard and dry I'd expose the cones on all sides by sanding then flood each side with thin CA and leave overnight - no accelerator.

When you drill, again flood inside with thin CA and leave to set before redrilling and gluing in tubes.

When turning, once you get down to 1mm off final size, again flood with thin CA and leave to set.
 
How were the cones stored after your baked them back in December? Were they sealed in an airtight bag? Were they left in the open? I would expect six months gave them plenty of time to regain lost moisture.

Did you fill the compressor's tank BEFORE casting? If so, you'd need a pretty good leak for it to take ten minutes to get to 40 psi.... If not, it's worth pre-filling the compressor's air tank (or an auxiliary air tank) before starting so you quickly get the pot to 40 PSI.

Did you use the white or the clear Alumilite? I'm guessing white. It has a shorter set time, but even the clear resin would've set up enough that the lack of quick pressure would make pressure pretty much pointless.

The white Alumilite, when it goes off, will seriously lighten your colors. Looks like that's what happened to your colors... If you're adding mica powders, use the clear (not water clear, just "clear"). Even without the powders, a few drops of dye will significantly reduce translucency (not enough to get away with unpainted tubes in a slimline but painted tubes are a good idea regardless...).
 
I do appreciate every one who took the time to make a suggestion.

1. As I stated in the post I dried them a SECOND time in the oven for 8 hours at 200 JUST before I cast them. How could they still have any moisture after 8 hours in the oven?
2. The first time dried them was 24 hours in the oven
3. The tank was filled just before I used it.
4. The Aluminite is water clear not white. I did end up using a white pearl because the color was way too dark. The color is ok but not what i wanted.

5. Curtis, are you saying that the additional 8 hours in a 200 oven was not enough time?
Should I have dried them even longer than 8 hours just before using?
These were dried in Dec. for 24 hours in a 200 degree oven.
How do you know when they are dry enough? They are tiny pine cones. The "petals" are really thin

6. The bubbles were hard not gooey at all. Is it possible that the humidity in the air caused the bubbles? Most of the bubbles were on the top with a few spaces further in. I have a moisture filter on my pressure pot that I store inside at all times until it is time to use.

7. Neil, Thanks for the suggestions on the flooding and turning. I did end up using the thin CA as you said
I trimmed and drilled one and I did flood the hole with thin CA and re drilled. I managed to turn and fill any air holes with CA as I went. I think they will turn out ok.
I am still working on it trying to get the finish smoother .
I will post the results when done.

I guess my main question now is to Curtis.
Is 8 additional hours in the oven at 200 not enough and how does one know how much time is enough?
Thanks Alice
 
Last edited:
Crashmph: DING, DING,DING, We have a winner!!!!
I figured out where the moisture was coming from
to recap
1. I dried the pine cones and additional 8 hours just before using
2. I have a moisture filter on my pressure pot that I keep inside in a dry place.

The rack inside of my pressure pot is made of plywood. The pressure pot with the rack was left outside on the porch several days before I used it.
If anyone has been following the weather in the midwest it has been very humid and rainy. The rack, just by touch feels wet !!! Ahhhh!!!!!!!!!! I have no doubt that is where the moisture came from. I guess it is time to make a rack out of some of my corian scraps!

thanks everyone.
the first pen turned out well and I think I can get at least two of the other blanks to work.
Lesson learned! I will get my son to take a photo of it when he gets home. I cannot seen to get one that is clear enough.

Alice
 
Last edited:
I just recently did my first pine cones, in water-clear. I cooked the pine cones for about 1/2 hour before the cast, and my mold for about 10 min. My mold is made out of 1/8" mdf glued with CA.

I did get a few bubbles and spaces. I belive it was caused by the resin setting up before all the air could either escape or be squeezed, and I think it was caused by two things.

One, there are so many nooks and crannies in the pine cone, it is hard to get the resin to flow quickly into all of them. I made my molds 1" deep, a little over the height of the pine cone. It was slow to pour, because it kept overflowing before it had a chance to sink to the bottom. Next time, i will make the molds about 1/2" deeper, so that I can pour in all the resin without having to stop and wait.

The second thing was the mold temperature. Heat speeds up the curing process, so my hot molds and pine cones on top of the slow pour all contributed to the bubbles.

Just my two cents.

Also with the colouring, how much pearl did you mix in. My very first pour, was supposed to be BLMB and a beautiful blue with gold shimmers, so I added what I thought was enough gold metalic. About a good teaspoon in 450gr of resin. Well, if you remember your school colour chart, gold is yellow and when a sufficient amount of yellow is mixed with blue........ Yep, you got it, a lovely pearlescent green.

The blank turned out beautiful, just not the colour I wanted. Because the pearl is whiteish, that may have contributed to the turquoise lightness of your green.

Keep pouring.
Thanks for your thoughts,
The first color I put in was Aluminite green dye and it was NOT green it was more of a teal.
That is where the color problem started.
I expected a true green. Everything else I added was just to try to lighten up the color because I did not want teal.
My sisters will love the pearl Aqua it became and my brother is color blind to green and blue so he is not going to know the difference Ha! Ha!
I think I will have to remake a blank for me later. The idea of the blue and green swirled was because those are the main colors of the Farquharson Clan tartin in Scotland who my dad's family is a part of.
I have a few pine cones left. I think I will hold each pine cone with a forceps pouring between the petals on each one then put it in the mold and finish pouring.
thanks
Alice
 
Alice, to answer your question to me...if you did not put the cones in an air tight container when you dried them in December, you can forget you even did that! As soon as you took them out of the oven, they began absorbing moisture from the air and within days, they were right back to being just as "wet" as before putting them back in. I would think 8 hours at 200° F the second time would have been good but again, did you let them sit to cool down for for any amount of time when you took them out the second time? Intricate things such as cones can be finicky with moisture. I would suggest heating them, then putting them in zip lock bags or an air tight container to cool down so they don't reabsorb moisture.

What I see in the picture is moisture FROM the cones. I do not believe your rack had anything to do with it but of course, could be wrong. I work in an air conditioned shop so my humidity is controlled and all my equipment is dry.

Hi Curtis,
They stayed in the oven until I was ready to use them.
I managed to save 3 so far of 4. The bubbles were mostly on the top
Inside it was more like spaces ON the pine cones them selves not near the pine cones. I used brown powdered furniture dye and the Ca glue and that worked nicely.
Luckily there were no bubbles in the resin after they were turned down

Wouldn't putting them in a zip loc bag hot cause moisture? this is confusing to me.

I don't cast things that much any more so it is like a learning curve the couple of times a year I do. I am more used to resin then Aluminite.
I think these will do nicely just a lot of extra work.
I appreciate your insight.
I have enough to do mine over. It will be a couple of weeks before I can get to it.
I'll see if I can get my son to take close up photos.
Thanks
Alice
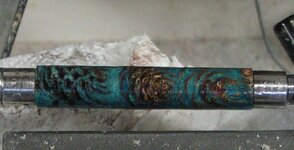
I was able to get a fairly clear photo of the second one I am turning. The dark brown spots are the ones I filled with the dye and CA glue. this has not been sanded after the last application of CA so it is not smooth.
There are no bubbles in the resin. I put mico glitter in the mix and the light bouncing off the glitter.
 

Attachments

  • pinecone.jpg
    pinecone.jpg
    61.2 KB · Views: 289
Last edited:
Alice,

If there is no moisture in the cones, then putting them in the bag can NOT cause moisture. You have to have moisture in the material to get any in the bag. As a matter of fact, putting them in the bag is a good way to know if they are dry enough. If you put them in the bag and get condensation, that tells you that they still had moisture in them and need further drying.

If your bubbles were near the cone petals inside the blank, then you did not have enough pressure soon enough. Personally, 40 psi is too low for intricate materials with lost of surface area. Taking that long to get to 40 psi was most likely your issue as the AlumiLite was curing long before you got there so the pressure did not do anything for you. You need to be able to get to your pressure in just a couple of minutes.

Good idea about the bag then. that is how I will tell if there is any moisture! Got it! My larger compressor is on the fritz and I had to use my tiny one. I did have problem getting the pressure up quickly even though I filled the tank just before putting it in there.
I really need to get the other compressor fixed!
 
Looks like you saved the blank anyway.

I put my materials in a dehydrator until dry, then place in sealed bags, but then back in the dehydrator for at least 24hrs prior to actually casting them. I also heat my molds as the warm resin/mold/product all helps the resin stay warm in the pot and flow better. I also use round metal cake rack sort of things between layers of molds, just balanced on the top of the molds. I had too many issues spilling resin with the multiple level timber racks and my method enables me to top up the mold after it is in the pot too.
 
Last edited:
my experience vs yours

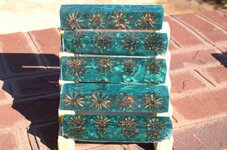
pressure at 55 psi using al clear...first bake the sweetgum balls for 24 hours at 200 degrees....put them into a plastic sealed bag, let cool, cool the b side of al clear, mix, color, put them into mold add al and...pressure to 55psi for a few hours....shoud be good to go
 

Attachments

  • PICT0258.jpg
    PICT0258.jpg
    270.2 KB · Views: 256
  • PICT0105.jpg
    PICT0105.jpg
    184.7 KB · Views: 281
I had some pine cones from a resinous type of pine, (logepole) and I dried them in an oven for several hours. They still had enough moisture in them to react with the Alumilite, and my blanks came out looking like that. Same batch of cones, but different variety, (Spruce pine cones) dried out nicely, and the only air bubbles were down at the center of the cones and easily filled with a touch of CA during the final stages of pen making. The process of casing 'stuff' in Alumilite is just a bit finicky, (IMHO) and at some point you'll figure out what works for you.
 
I am very interested in this discussion because I plan to cast some pine cones as soon as I have the equipment to do the casting. I am curious as to why people are drying these for such long times at such low temperatures. It seems to me that using 250 or 300 degrees (well above the boiling temperature of water) would be much more effective at removing moisture and doing it quicker. And since pinecones have such low mass, the difference between 2 hours in the oven vs 8 hours in the oven doesn't seem like it would make much difference, especially if the temperature is high enough.

Also, would a soak in solvent like laquer thinner or alcohol be a good step to be sure any pine resins are removed that might affect the bond between the casting resin and the pine cone?
 
Pine cone resin is very flammable. The higher the temp, the more likely the cones will 'flame out'...
 
I've got some cones in PR drying right now. Finished a pen with one of my blanks yesterday. Using little Hemlock cones, dried 4-5 hours at 150 in the toaster oven. I did blow one up--the cone material is very brittle and I stuffed the mold full of them. Stupidly forgot to cut the blank long and cut it off after drilling. Blew the end out. I was able to save it, and it came out pretty good. This is in PR, 7 drops of MEKP and no pressure. Very few voids and it finished up nicely.
 
Here's my secret for casting mini pine cones. They are very easy to cast successfully, but there are a few tricks.

  • First, as has been mentioned, you have to start with bone dry pine cones.
  • When you're ready to cast, stuff the pine cones into a 5-1/2" piece of 3/4" PVC pipe that has one end sealed (I use painter's tape).
  • Now, since I have only used PR, not Alumilite, this probably won't apply to AL, but heat the resin to get it really thin. After mixing in the MEKP (3-4 drops per ounce) and colorants, if any, I use a microwave oven to heat about five ounces of resin for 20 seconds at 50% power (your time may vary). Use UNCOATED PAPER cups, NEVER plastic.
  • Quickly get back to your pine cones and pour the resin into the tubes. You will only have enough time to pour two, possibly three tubes before it begins to gel and set up.

There is no need to use pressure with this method since by the time you are finished pouring, the resin will have already gelled and you won't be able to compress the bubbles anyway. The good part is that because the resin is so thin it easily flows into and fills all the little voids and pockets that the pine cones create.

Another big advantage of heating the resin is that it cures very quickly. You can knock them out of the tubes within a few hours instead of the following day.

I have cast many tubes of pine cones this way and have never had problems with voids. You might have some tiny ones, but they are easily filled with CA when you turn.

Turn them as any acrylic blank and finish with a couple of coats of CA to seal the pine cones that are exposed and to create a smooth surface.
 
Let me be the oddball here and go in another direction. First thing I would do after drying is stabilize in Cactus Juice under vacuum. Curtis????? Then I would use poly resin instead of Alumilite due to all the intricate nooks and crannies. Vacuum again take out the air instead of trying to crush it down and resin gives you the time to do it. Use a deep mold because it will foam some. DAMHIKT. After all is vacuumed airless it can harden to its hearts content and you shouldn't find any bubbles inside. (No pens were injured while composing this comment). My way (and everyone has their own that works best for them) is if casting objects inside the blank I use resin with vacuum, if not the process is up for grabs.
 
Back
Top Bottom