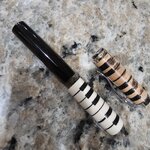
Burn/bleed over from ebony to maple

Signed-In Members Don't See This Ad

DMacinID

Member
Joined
Oct 10, 2022
Messages
12
Location
Meridian, ID
Hey Folks,

I'm working on a pen design for a gift to a piano player.

It's segmented with Maple as the keys, thin Walnut as the "spaces", and Gaboon Ebony for the flat/sharp keys.

This was my 2nd (3rd?) attempt, so I went ahead and finished/assembled it, even though it didn't turn out as planned.

I read through this thread <https://www.penturners.org/threads/not-so-much-showing-off-a-pen-as-a-lesson-learned.149337/>, where the OP asked two questions (re: busy segments, and Maple discoloration), but the discussion focused on segmenting.

I'd love to hear any tips/tricks/wisdom anyone can share about what might have happened to the Maple, and how to avoid it. I think it's just sanding dust from the Ebony. BUT, not sure what I can do to mitigate (or better yet, eliminate!) the problem.

I'm all ears!

- DMac

1000000075.jpg
 
Signed-In Members Don't See This Ad
Echoing what was said above, use something for a sealer to keep the ebony from bleeding. I know ebony can be finicky with the natural oils present, so be careful about wiping it down with denatured alcohol to allow the sealer to penetrate. I'd do a test piece to see if the alcohol causes any smearing.

I am liking the design, though!
 
I find that using something as a sanding sealer after turning but before sanding will help if not eliminate this problem. I usually use thin CA.

I really like what you are doing with this design!!
I think the design is stunning . It does look like sanding dust getting into the grain. Sealing as suggested will help possible with this CA to impregnate the fibres and maybe " washing " with alcohol between standings . I suggest CA and alcohol as the alcohol will not effect the CA , but alcohol would could/ dissolve sanding sealed potentially making your problem worse.
 
You really did not tell us your whole story. When did you notice the contamination of the 2 woods? Was it when you sanded the blank or when you wiped the blank with whatever finish you were using? And what finish did you use and what method? This will help narrow down the area that needs work. here is my thoughts. This problem comes up here many times and there is a cure. The cure is to learn to use the skew. No sandpaper should ever touch that blank. Get down to your final measurements with a tool of your choice but make some final passes with a good sharpened skew and walk away. Now for finishing. I would hit the final blank with very very light spray of dewaxed shellac If you do not have that then a sprits of lacquer. You are not using it as the final finish, you are just sealing the wood. I do not like the use of wiping it on because you can transfer the colors with paper towels too.

Now I looked at the pen again and what happens photographs sure can highlight flaws. Gabon Ebony is a beautiful wood to work with and gets a bad rap here many times because people say it cracks. I have yet to see this and I use it alot. But your tooling on the lower barrel needs more attention and you need to sand with the grain more to get rid of tool marks. I see the rings from the tools. Also what finish are you using? A skew is a tool that just needs to be learned and will help in so many ways in pen turning.

here is a couple examples that I have shown over the years where if I did not follow my own advise I would have wound up with blanks like yours. I am just giving my advise. there are other methods that others have used and will work also. But here is my proof. First pen is Gabon Ebony and Holly. Second pen is Bloodwood and Maple.
Copy of IMGP0881.JPG
Copy of IMGP0897.JPG
Good luck.
 
Are you sure that it is the Ebony that is the problem? I find it somewhat interesting that the "bleed" only appears to be around your walnut separators and not the ebony keys themselves. As JT asked, can you tell us more about the process you used and exactly when the bleed seems to have appeared. Many of the potential reasons and potential mitigation measures have already been mentioned.

I've had plenty of bleeding problems but usually from Padauk. The Denatured Alcohol that I use for cleaning and de-oiling the surface before I apply a finish is usually the culprit. I also avoid sanding after turning if at all possible -- take very light and even passes so there are no tool marks left behind that require sanding.

On one blank, I used Black CA to glue my segments together thinking the black would help hide any small gaps between the segments, but the Black CA wicked into some of the wood and caused some bleeding that looks a lot like what can be seen in your picture. The fix was easy, I went back to regular clear CA.

Best Regards,
Dave
 
Until Dave mentioned the walnut, I had to go back and look. From photo it looks like some spaces were walnut and some ebony. Not sure why you would not have just used ebony and skipped the walnut. He does bring up an interesting observation about where the smudge marks are. We need more info. Also tell us what adhesive you used. Walnut is the softests of all the woods you used so that can be where the problem started.

Also why is this one side? Do you have this happening around the pen? Maybe show us all sides of the pen. Something is weird here.

A way around this is to use black acrylic as spacers and keys as I did in this piano pen box. Take even further, use a white acrylic for other part. No finish needed on that part of the blank and no worries about bleed over. Just saying. This is my plans for the pen for this box. It is on my to do list but the design is trickier than the basic piano key look as you have.

Copy of IMGP0194.JPG
Copy of IMGP0202.JPG
 
Last edited:
Until Dave mentioned the walnut, I had to go back and look. From photo it looks like some spaces were walnut and some ebony. Not sure why you would not have just used ebony and skipped the walnut. He does bring up an interesting observation about where the smudge marks are. We need more info. Also tell us what adhesive you used. Walnut is the softests of all the woods you used so that can be where the problem started.

Just guessing but the smudge marks line up with the ebony black keys, so I'm guessing it happened during cleaning or sanding before sealing with lathe running. To your point John, still guessing though without more details on when this happened.
 
You really did not tell us your whole story. When did you notice the contamination of the 2 woods? Was it when you sanded the blank or when you wiped the blank with whatever finish you were using? And what finish did you use and what method? This will help narrow down the area that needs work. here is my thoughts. This problem comes up here many times and there is a cure. The cure is to learn to use the skew. No sandpaper should ever touch that blank. Get down to your final measurements with a tool of your choice but make some final passes with a good sharpened skew and walk away. Now for finishing. I would hit the final blank with very very light spray of dewaxed shellac If you do not have that then a sprits of lacquer. You are not using it as the final finish, you are just sealing the wood. I do not like the use of wiping it on because you can transfer the colors with paper towels too.

Now I looked at the pen again and what happens photographs sure can highlight flaws. Gabon Ebony is a beautiful wood to work with and gets a bad rap here many times because people say it cracks. I have yet to see this and I use it alot. But your tooling on the lower barrel needs more attention and you need to sand with the grain more to get rid of tool marks. I see the rings from the tools. Also what finish are you using? A skew is a tool that just needs to be learned and will help in so many ways in pen turning.

here is a couple examples that I have shown over the years where if I did not follow my own advise I would have wound up with blanks like yours. I am just giving my advise. there are other methods that others have used and will work also. But here is my proof. First pen is Gabon Ebony and Holly. Second pen is Bloodwood and Maple. View attachment 371067View attachment 371068 Good luck.
Hey John,

Thank you for the very detailed reply, and sharing your art. Those are both stunning! What a labor of love.

This forum is amazing! I'm relatively new, but this is the second time I worked myself into a corner, and got great support from the community, so thanks to everyone for tips & tricks to try.

I really appreciated how many people offered suggestions, and now I have several things to try, including both process improvements as well as material choices.

Today I remade the cap using ivory ebonite for the keys, black CA for the spaces, and for reasons I can't explain, Ebony for the # keys (rather than black ebonite, which I also had on hand... :-/)

I also refinished the Ebony body with CA and Micro mesh pads, and it looks MUCH better.
[Pic attached]

It's far from perfect (it broke, so you can see where one space is wider where I re-glued it. I'm still prototyping, and each round I've learned a ton more.

Several asked, so to close the loop, here is what I did the first time (maybe as a leason in what NOT to do?) ;-)

- used Titebond II for the segments
- turned to my desired dimensions (w/carbide tools, haven't learned the skew yet)
- sanded from 180...600. I don't remember exactly when the bleed showed up, but AFAIR, it was during sanding.
- Mylands sanding sealer
- Yorkshire grit
- Pens Plus

20240324_220550.jpg
 
Back
Top Bottom