Birdhouse

Signed-In Members Don't See This Ad
See more from kludge77

kludge77

Member
Joined
Mar 9, 2009
Messages
644
Location
Santa Rosa Ca
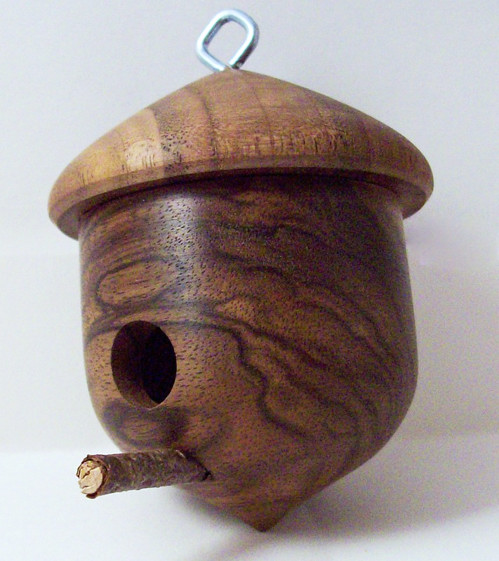
These are really fun to do, but they are a bit more labor intensive. Just due to all the steps. Personally I like hogging out the base with a fortsner then cleaning up with a scraper. But I am inherently lazy!

1_th_bhouse-1.jpg


Claro base, French top and a stick picked off my pine tree.

This is from a bit ago. Just turned another with a persimmon base. Guess it was a little wet still because it was cracked in half this morning!! :eek:

Oh well. Good practice at least :)
 
Signed-In Members Don't See This Ad
Looks huge in the picture. It's actually my summer home!!

Here's some perspective. and my split one...

b-houses.jpg


Just the persimmon alone. Would have been a good one.

persimmon.jpg
 
Those are the quickest sellers of anything I make. My wife's girlfriends are on a waiting list for them around christmas. I get tired of making them, but they are very popular.
 
I make and (luckily) sell quite a few of birdhouse ornaments also around this time of year.

I have found, that the houses that have a little 'quirk' to them sell quicker (some call them artful :)

My point being, you should take a contrasting wood and 'fix' that crack..a little CA and whalla...new 'artful' ornament..!!
 
Norm abrams used to put black epoxy into cracks and checks...the idea being that if you can't hide it, flaunt it...might be an idea there...

What price point do you all sell these at? I have just been making them for the tree, but I'm curious... fifteen dollars +/-?
 
I could get out the staple gun and duct tape I suppose. This one split because the wood shrank. It's toast. But a good suggestion. People so like "unique" looks.

Right now though I've got walnut coming out my ears, so thats what will probably end up as it's new base...
 
Hey kludge77,

Neat bird houses. I still think the crack can be fixed. By the way, being lazy 'ain't' all that bad. I used to think it was until someone explained that all advances begining with the wheel were done by a lazy person looking for an easier way to do something. See, lazy is not always bad, hang in there.

Charles
 
I always heard that if you have a tough job and need a good answer, give the task to a lazy man...because he will find the quickest/easiest way to solve it :)


Hey kludge77,

Neat bird houses. I still think the crack can be fixed. By the way, being lazy 'ain't' all that bad. I used to think it was until someone explained that all advances begining with the wheel were done by a lazy person looking for an easier way to do something. See, lazy is not always bad, hang in there.

Charles
 
for me...usually between $20 - $30..depending upon complexity, size, woods, etc..


Norm abrams used to put black epoxy into cracks and checks...the idea being that if you can't hide it, flaunt it...might be an idea there...

What price point do you all sell these at? I have just been making them for the tree, but I'm curious... fifteen dollars +/-?
 
Nice bird houses. I think that you could fix the persimmon, either with another piece of wood, or by inlaying it with inlace, wood shavings of another kind of wood, or ground stone.
 
I can't see the pic :( but reading about the crack makes me wish I could see it. the one in your first post looks good. I for one think sometimes the cracks should be just that, a crack. depends on the person, but the rustic look is sometimes good.
 
I say wood putty the cracked one and leave it.

Nice work Peter how do you chuck these up for turning? I aint got no fancy jaws so just wondering what you use?
 
I say wood putty the cracked one and leave it.

Nice work Peter how do you chuck these up for turning? I aint got no fancy jaws so just wondering what you use?

You could totally do this with a faceplate and jam chuck. There is nothing on the lathe that you NEED a 4 jaw chuck for. It just makes it SOO much simpler.

To start. glue blank (2x2x8) to a waste block (3/4 x 4 or so)
Then screw the face plate to that.
Now rough it to a cylinder.
Mark and drill your two holes with a hand drill. I think mine are 1/2 and 1/8. Whatever looks right. (twist bit not brad point)
Then hollow it out down to the bottom hole you drilled. leaving 1/4 or so of wall. ( I hog it out with a large forstner in the tailstock then clean up with a scraper)
Next shape the outside and then part off the base from the rest of the blank.

Now with the stock you have left you will make a jam chuck to hold the base

True up the face with a scraper.
Then with your parting tool make a tenon (1/4 or so) to match the hollow in the base.
Stop frequently and check. The mating should be snug but not too tight.
Mount the base and turn the bottom. (light cuts!)
Now sand and finish. The base is done.

Now for the roof.
The tenon you turned will be part of the roof
Turn and shape the top and then part off.

Now make a jam chuck to hold the roof (if there is enough material. Other wise glue up another blank and waste block)

True up the face with a scraper.
turn a recess and mate the roof
Mount the roof and finish shaping the roof (light cuts!)
At this point I drill a 1/16 hole in the roof for the hanger (Jacobs chuck in the tailstock)
Now sand and finish. The roof is done.

Assemble with a little bit of glue.

Enjoy.
 
Last edited:
When I Make Mine

I do similar to Kludge.

I have a 4-Jaw Chuck I got from Grizzly for around $50-60. I took a piece of 2"sq Maple and made a "Jamb Chuck" with it by turning a tennon on it that is about 3/4" long by 3/4" in diameter. I left a tennon on the left of it that is about 1-1/8" in diameter that acts like a "Bushing" does in pen turning - to get my final diameter

For the bodies, I take a 1.5"x1.5"x2" piece of wood (I like Cherry, Maple, Oak, or Walnut here) - and drill a hole in it on the drill press about 1" deep. I then take the block and fit it on my jamb chuck usually with a piece of paper napkin between the block and the tennon for added tightness. Finally, I turn the body down to the shape I want leaving the one end flush with the 1-1/8" tennon. I then use my parting tool to make a tennon on my body that is about 1/16" shy of the 1-1/8" sizing tennon.

For the Tops, I take another block of 1.5"x1.5"x2" piece of contrasting wood. In the past, when I make rock maple bodies, I like to use Redheart tops. I put this directly in the chuck, turn it round, make quill end slightly concave and add a 1-1/16" hollow that is 1/8" deep. This gives me a good glue joint for joining the top and bottom together. I then shape the cap as desired.

If I'm trying to make them really look like acorns, i'll texture the cap/top using my dremel tool. I usually do this with Walnut and Maple combinations.

Other variances I do - before removing the body, i'll drill a 1/8" diameter by 1/8" deep hole in the bottom end of the body. I then add a custom finial made in the same material that the cap/top is made from. I also use the same material to make the perch.

Craft Supplies sells (or used to) little birds that you could glue into the hole or on the perch.

To finish the ornament, I use a simple eye screw that I put into a 1/16" hole in the top end of the cap. I drill the hole to prevent cracking and I glue the eye screw in to make sure it never comes out. I drill a 3/8" hole into the side for the little bird to make his/her way in and out and a 1/8" hole for the perch. I CA glue all the pieces together and add a Martha Stewart ribbon onto the eye screw so that it can be hung.


This example uses Spalted Maple as the top, finial, and perch - with dark spalted Madrone Burl as a body. This one was made for my son 3 years ago for Christmas. I went with the 'Bee-hive' style finial to try something new.
BirdhouseChristmasOrnament.jpg
 
Back
Top Bottom