Casting Anxious to do my very first Cast Tomorrow

Signed-In Members Don't See This Ad

egnald

Member
Joined
Jun 9, 2017
Messages
3,776
Location
Columbus, Nebraska, USA
Hello all, well, today two boxes arrived from Dawn and Ed at Exotic Blanks. They had everything I needed to venture into casting -- and a lot of it was on sale! California Air Tools Pressure Pot, precision scale, IR gun (thermometer), 8 lbs. of Alumilite Clear Slow, Stoner Mold Release, some Alumilite dyes and some Eye Candy powders along with mixing cups and other misc. stuff.

I tested the Pressure Pot a while ago and put the finishing touches on my 3/4-inch PVC mold setup, so tomorrow is the big day.

Dave
 
Signed-In Members Don't See This Ad
Sounds like a great setup. Looking forward to your results. Are you casting anything or just color swirl? Both are fun and creative.
 
Welcome to the new rabbit hole in pens. I think it's a hobby in itself. It will definitely open up a lot of doors for you to try. It will also give you a few trials along the way. I say that no to discourage you but to let you know to expect it and don't give up. It is a lot of fun and rewarding when you hold the finished product in your hand. I'm also looking forward to seeing what you come up with.
 
Good Luck Dave! One piece of unsolicited advice is to (mostly) ignore the 12 minute working time that Alumilite Clear Slow mentions in the instructions, and go by the temperature of the resin instead. The warmer the resin gets, the better the color separation. If you can hold off until the resin is 95F or higher (even up to 105-110F) before pouring/mixing colors, you will really like the results.

KC
 
Hello all, well, today two boxes arrived from Dawn and Ed at Exotic Blanks. They had everything I needed to venture into casting -- and a lot of it was on sale! California Air Tools Pressure Pot, precision scale, IR gun (thermometer), 8 lbs. of Alumilite Clear Slow, Stoner Mold Release, some Alumilite dyes and some Eye Candy powders along with mixing cups and other misc. stuff.

I tested the Pressure Pot a while ago and put the finishing touches on my 3/4-inch PVC mold setup, so tomorrow is the big day.

Dave
Awesome. I have that same pressure pot and it has worked out very well for me. I'm sure you will enjoy it.
 
Good Luck Dave! One piece of unsolicited advice is to (mostly) ignore the 12 minute working time that Alumilite Clear Slow mentions in the instructions, and go by the temperature of the resin instead. The warmer the resin gets, the better the color separation. If you can hold off until the resin is 95F or higher (even up to 105-110F) before pouring/mixing colors, you will really like the results.

KC
I kind of figured that out once I got going. I stirred for about 6 minutes, then distributed to my pigment cups. It was already 10+ minutes before the temperature reached 95, then I poured as quickly as I could in the patterns I decided to try. It was nearly 14 minutes before I got it under pressure. Even at 14 minutes, the resin still poured fairly well, so I figured I would be OK. It's been about 3 hours so far, and I decided to wait a full 4+ hours before taking it out of the pot.

I also read somewhere that the full cure can be accelerated by raising the temperature to 150F - so I will just put them outside to help speed up the full cure. -- It's not really 150F outside but it almost feels like it!

I will post some pictures in a couple of hours after I demold. (I sure hope the Stoner did it's magic so I can demold). - Dave
 
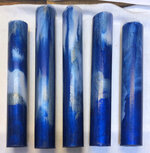
Results of my first cast and things I learned.

These blanks are Alumilite Clear Slow
- 30% Eye Candy Nokon BLue
- 30% Eye Candy Carolina Blue
- 40% Pearl-Ex Interference Blue + 2 drops Alumilite White Dye

1) My calculations for Alumilite Clear Slow were off a little because I didn't figure in any spillage and other loss. I will adjust accordingly for future pours.

2) It is Ok to extend the 12 minute working time to 14 minutes (at least it was OK for my first pour experience)

3) I need to buy some bamboo skewers for swirling - the sticks I have are just a little too short which makes it kind of cumbersome.

4) I need to consider buying some 250ml Silicone cups for mixing pigments and pouring. I think the spout would help and they are re-usable by peeling out the cured resin.

5) My homemade PVC Pipe mold setup worked just great. I am going to have to build a 2nd one though so I can make them another 1/2-inch longer to give me a little more wiggle room in making sure they are at least 5-inches long.

6) I need to buy more stuff - this whole experience was a blast! I might even do a 2nd pour before the end of the day!

I can hardly wait to make them into pens!

Regards,
Dave

Two views (Click on Thumbnails to Zoom-In)
IMG_3802 Cropped.jpg IMG_3803 Cropped.jpg
 
Congrats Dave, good results on your first pour. I hope you've got a log of some type to record your successes and failures. I've had plenty of both.
 
Look great from the outside, Dave!! Can't wait to see the resulting pens! Usually the inside is much more interesting.

GREAT first effort!!!

Ed
 
Congrats Dave, good results on your first pour. I hope you've got a log of some type to record your successes and failures. I've had plenty of both.
Yes - I made a log and stored it along with the pictures of the blanks. I'm planning on putting pictures of the turned blanks in the same folder along with the pour log. - Dave
 
Look great from the outside, Dave!! Can't wait to see the resulting pens! Usually the inside is much more interesting.

GREAT first effort!!!

Ed
Thanks Ed,
It was simply a blast. Thank you and Dawn for getting this stuff shipped out so promptly so I could play over the Labor Day weekend. I already have my next order started for more stuff. - Dave
 
I love hearing your report of what worked and didn't work. After I get the bare minimum I need to make my kitless pens sorted out, I'm hoping to try casting also.

They look great Dave, can't wait to see one turned.
 
Thanks Ed,
It was simply a blast. Thank you and Dawn for getting this stuff shipped out so promptly so I could play over the Labor Day weekend. I already have my next order started for more stuff. - Dave
We were kinda rushing around the last couple days!! We realize the "holiday" gives everyone a little more time, so we really try to get everything out!! Thankfully, UPS co-operated and rushed it to you!! ENJOY!!!
 
Hello all, well, today two boxes arrived from Dawn and Ed at Exotic Blanks. They had everything I needed to venture into casting -- and a lot of it was on sale! California Air Tools Pressure Pot, precision scale, IR gun (thermometer), 8 lbs. of Alumilite Clear Slow, Stoner Mold Release, some Alumilite dyes and some Eye Candy powders along with mixing cups and other misc. stuff.

I tested the Pressure Pot a while ago and put the finishing touches on my 3/4-inch PVC mold setup, so tomorrow is the big day.

Dave
I'd like to venture into that as well... keep us informed of the ups and downs of the learning curve.
 
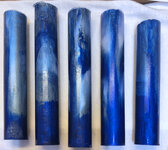
Results of my first cast and things I learned.

These blanks are Alumilite Clear Slow
- 30% Eye Candy Nokon BLue
- 30% Eye Candy Carolina Blue
- 40% Pearl-Ex Interference Blue + 2 drops Alumilite White Dye

1) My calculations for Alumilite Clear Slow were off a little because I didn't figure in any spillage and other loss. I will adjust accordingly for future pours.

2) It is Ok to extend the 12 minute working time to 14 minutes (at least it was OK for my first pour experience)

3) I need to buy some bamboo skewers for swirling - the sticks I have are just a little too short which makes it kind of cumbersome.

4) I need to consider buying some 250ml Silicone cups for mixing pigments and pouring. I think the spout would help and they are re-usable by peeling out the cured resin.

5) My homemade PVC Pipe mold setup worked just great. I am going to have to build a 2nd one though so I can make them another 1/2-inch longer to give me a little more wiggle room in making sure they are at least 5-inches long.

6) I need to buy more stuff - this whole experience was a blast! I might even do a 2nd pour before the end of the day!

I can hardly wait to make them into pens!

Regards,
Dave

Two views (Click on Thumbnails to Zoom-In)
View attachment 359638 View attachment 359639
In regards to #3, look at silicone stirrers. You can find them on Amazon for cheap and they clean up fairly easily.
In terms of silicon cups, they work, but it's a pain to clean them completely. My wife was spending more time cleaning up after a pour than the pour itself. She opted to get a bulk pack of paper cups from an online restaurant supply place. With a box of like 2-3000 cups, even at 6-7 colors per pour, she'll be good for a while.
I agree, I have some of those silicone cups a pain to clean. Paper cups would work well I would think you could also easily make a spout with them to make pouring easier.
 
I agree, I have some of those silicone cups a pain to clean. Paper cups would work well I would think you could also easily make a spout with them to make pouring easier.
I use clear plastic cups, 16oz. When your mixing the resin a clear cup helps ensure it's mixed well. When your done you pour out what's left and leave the cup set overnight. Next day you just peal the remaining resin out and toss it. I bought 100 cups 3 years ago and I still have about 80 of them.
 
I use clear plastic cups, 16oz. When your mixing the resin a clear cup helps ensure it's mixed well. When your done you pour out what's left and leave the cup set overnight. Next day you just peal the remaining resin out and toss it. I bought 100 cups 3 years ago and I still have about 80 of them.
Oh! Well now, that's a great idea. I certainly like the idea of reusing.
 
Back
Top Bottom