Alumilite Issues

Signed-In Members Don't See This Ad

woodwzrd

Member
Joined
Oct 26, 2011
Messages
451
Location
Baraboo WI
I bought a gallon of alumilite with the bash discount and just finally got a chance to cast some of it. So far I am 0 for 2. I am trying to cast some cholla blanks. Here is what is going on. I have a mold that I made out of cutting board just like the stuff Curtis uses. The first run I cut my cholla to fit in my mold. I then mixed the resin by weighing out 4.5 oz of the A side. Next I added my pearl exe and mixed it in really good. Lastly I added 4.5 oz of the B side to the tinted A side and mixed it for about 30-45 seconds. Then I put them in the pressure tank at 80 lbs. for 2 hours. I did not use any kind of mold release. When I tried to de-mold the blanks they were stuck tight. I tried to pry them out with a screw driver and they broke a part. They kind of reminded me of what a piece of hard candy looks like after you drove it. There were areas where there was little if any bond with the cholla. I figured they stuck because I didn't use any mold release. Since I don't have any mold release, on round 2, I sprayed my mold lightly with a little WD 40. I did everything the same as in the first go around and got almost the same exact result only the second time around the blanks came out a little easier. They are still quite brittle with hit and miss bonding to the cholla. The only thing I can think of is it is too cold in my shop. When I case them it was just short of 50 degrees (latest heat wave). I am open to any suggestions as to what to do. I have an order for several of these blanks and would like to get them done soon but am stumped. The pic shows the blanks and what my mold looked like after I got the blanks out on the second attempt. Thanks for any help.
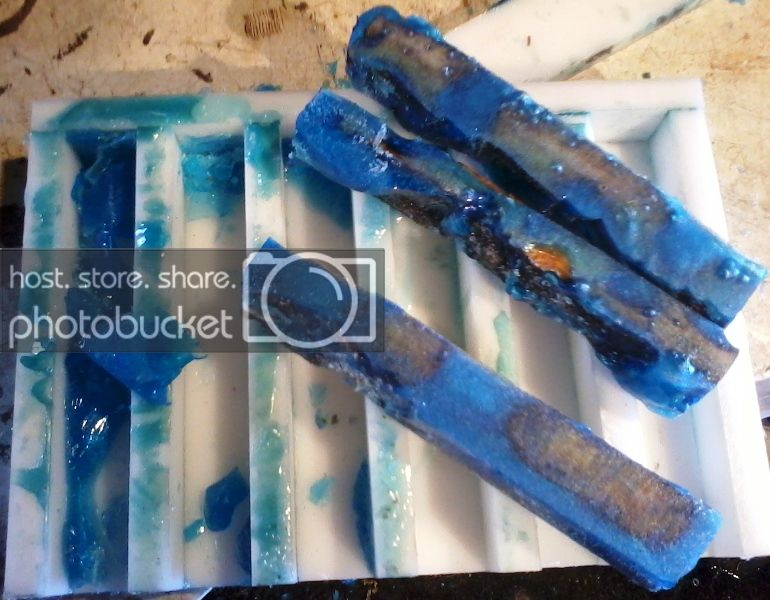
Photo0080_zps0d02c533.jpg
 
Signed-In Members Don't See This Ad
My first thoughts are that ur resin is too cold. Do u store it in your 50 degree garage? Maybe it could be your mixing strategy? Maybe Curtis will chime in. He's the specialist when it comes to Alumilite.

Dave
 
My first thoughts are that ur resin is too cold. Do u store it in your 50 degree garage? Maybe it could be your mixing strategy? Maybe Curtis will chime in. He's the specialist when it comes to Alumilite.

Dave

I have been storing the resin in the house and only took it out to the shop to cast.
 
Wow this is crazy. I used cutting boards for a while with never having an issue. First I would scrap the WD-40. I use a DuPont silicone spray from lowes as my mold release, not sure if WD-40 could cause a reaction. Are they sticking to the cutting boards? Are they fully cured and hard when you demold? Looks like your blanks still have some ambient moisture in theme. I would cook them for a few hours at 150* to dry them out before casting them. Also, I used some plumbers putty on my cutting board joints so the resin could not seep under them and get trapped. Also, are your blanks clean? Looks like some spots its delaminating from the cactus. Maybe a little dirty still and not getting a good bite, if so wash and scrub them in some water.

Sorry if this was just a bunch of rambling. I was thinking of things while typing.
 
Last edited:
Ditto on the cholla not being dry. If you have a moisture meter, check the moisture in them. The3 slightest amount will cause bubbling or foaming.
Also, to be sure you have the A and B mixed thoroughly, mix them together first ant be sure the mix has cleared, then mix in the Pearl Ex.
 
First, make it so you can take off one end of the mold so you can de-mold easier. With it off, tap all the edges with a mallet and turn it upside down and smack it on your bench. They should then just pop out. Forget the mold release and especially the WD40.

You might also want to put the mold and all in your toaster oven at 140° or so for 30 minutes to heat it up. With the dividers like you have, if the mold is cold, it is going to take a lot of the reaction out of the Alumilite.

Then, like Monty says, mix the A&B together before you add any colorant. Some get by doing it the way you did but as a beginner, it is MUCH safer to use a clear cup and mix both sides first. With a clear cup and no color yet, you will be able to see when they are properly and thoroughly mixed. I doubt 30-45 seconds was enough time.

Lastly, put your cholla in the oven at 150° for 3-4 hours prior to casting to make sure they are completely dry. Cactus has a high propensity for absorbing moisture from the air and if they are not completely dry, you will have issues.
 
Hi woodwzrd -

Like Curtis said, dry your cholla, the foaming looks like moisture caused it.

One question about your cutting board molds. Did you run one side of the cutting board through your surface planer to smooth off the texture so your castings will slide out? The texture on the cutting board will hold your finished castings and make it difficult to de-mold without taking the mold apart.

I've used vasaline as a mold release with success. I use both Stoner mold release too.

BTW, hello from Madison

Tom
 
I have found that planing the board first does NOT help it come out better. Actually, it demolds better when it is not planed. I used to plane mine but stopped when I figured this out. That has been about 100 or so molds ago!
 
Thanks for all the help everyone. Depending on what time I get home this afternoon I am going to cook some cholla and give it another try using all of your great advise.
 
I have found that planing the board first does NOT help it come out better. Actually, it demolds better when it is not planed. I used to plane mine but stopped when I figured this out. That has been about 100 or so molds ago!

I too have found that not planing the boards works better. A flat smooth surface seems to suck the resin to the board (think vacuum). The rough surface helps the blanks release a little bit better.
 
Thanks for all the help everyone. Depending on what time I get home this afternoon I am going to cook some cholla and give it another try using all of your great advise.

Scott,

Do yourself a favor and try small batches as you experiment. You'll waste less resin that way till you perfect it. Trust me, I've learned the hard & expensive way...

Mike B
 
I have found that planing the board first does NOT help it come out better. Actually, it demolds better when it is not planed. I used to plane mine but stopped when I figured this out. That has been about 100 or so molds ago!

Excellent! - Thanks Curtis, that will save some work and keep the boards a little thicker. I've got a couple of molds I want to make and this will help.

Thanks
Tom
 
The reason not planing works better is due to the wax on the surface. A good friend of mine is a retired chemical engineer. He was the VP of Quality Control and Processes for Exxon Mobile world wide before he retired. Exxon Mobile is one of the largest producers of polyethylene which these cutting boards are made from and one of the products he worked extensively with. According to him, PE is a high weight wax rather than a plastic. He says that when the material cures, low weight wax comes to the surface, hence the reason nothing sticks to PE very well. When you plane the cutting boards, you are removing that low weight wax on the surface, thus reducing is releasing ability. That is also the reason that a cutting board mold gets to the point where it is harder to get the resin to release after many uses. The low weight wax has been removed with successive releases over time!
 
Back
Top Bottom