A little quick easy segmenting

Signed-In Members Don't See This Ad

jttheclockman

Member
Joined
Feb 22, 2005
Messages
19,462
Location
NJ, USA.
Here is a little project that is quick and easy and lends itself to a myriad of possibilities. You can change the fill material or the blank material. You can add cuts or subtract cuts. You can cut all the way through or half way such as I did. Hope some of you give this a try and I look forward to seeing them. I also will answer any questions

These are sometimes refered to as swirls or feathers but whatever you call them they are easy to do.

This is a sierra vista chrome kit with a poured white acylic blank with red and black pickguard material as the fill. My cuts were half way through the blank to give that effect. Thanks for looking.


IMGP0973_zpsd4700936.jpg


IMGP0976_zps614c42f9.jpg


IMGP0975_zpscccb7c31.jpg
 
Signed-In Members Don't See This Ad
Been wanting to try one of those since I got the table saw for Christmas...thanks for the basic ideas, I like not being told everything but given the visual to get going!
 
. My cuts were half way through the blank to give that effect.


https://img.photobucket.com/albums/v233/JTTHECLOCKMAN/IMGP0973_zpsd4700936.][/QUOTE]

Hi JT,

I wish to try this helpful tip. Do you mean to say that the 'cut' should be less than HALF way through to get your effect? You will save me and possibly others a bit of time if you confirm. It's too cold for me to enter my shop at this time and I just want to be prepared when the weather gets better.

TIA.:smile:
 
. My cuts were half way through the blank to give that effect.


https://img.photobucket.com/albums/v233/JTTHECLOCKMAN/IMGP0973_zpsd4700936.][/quote]

[quote]Hi JT,

I wish to try this helpful tip. Do you mean to say that the 'cut' should be less than HALF way through to get your effect? You will save me and possibly others a bit of time if you confirm. It's too cold for me to enter my shop at this time and I just want to be prepared when the weather gets better.

TIA.:smile:[/quote][SIZE=3]Hi Peter; Here's JT's answer from another forum![/SIZE]

[SIZE=3]"[/SIZE][SIZE=2]You are somewhat correct also on the depth of cut. It was just shy of half way through the blank when made each cut so somewhere between 1/3 and half way. I have another blank that does something similar but a little different design. There as I said so many simple little things that can be done with this technique. Hope to find some more shop time. I have a few blanks that need to be turned."[/SIZE]
 
Thanks Max for the help on that.

I probably should not have said half way because if I were to cut half way on both the top and bottom rings the 2 halves would meet thus forming a complete ring. It was about 1/8" from the half way line. I made a center mark on the blank which divided the blank in half. I placed the blank next to the saw blade and lowered the blade so that it was about 1/8" below the mark. This is not critical but does affect the outlook. I keep all cuts the same.

Moishe

No router on this one. I used a 7-1/4" saw blade to make the cuts. It just so happened this blade was thin enough to fit the inlay material exactly. This is why I said this is such an easy segmenting project because all you need is a way to cut the slices. It can be done with a tablesaw which I did or even a bandsaw but the kerf would be alot thinner and thus the material for inlay will be thinner. Now of course you can increase the kerf on a bandsaw by just moving your stop block abit.


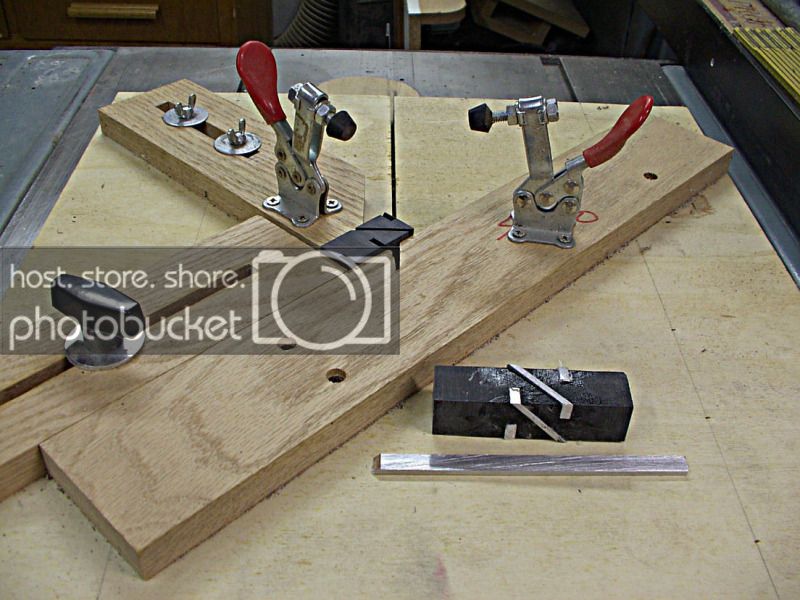
Here is the jig I used to make the angled cuts on my tablesaw. I think I posted this once before but I forget. The angles were cut at 45 degrees but any angle will do. The straight cuts obviously were cut with the miter gauge set at 90 degrees to blade.


45degreesledfortablesaw.jpg


One other note I would like to make mention of. Not sure how many people use pickguard material for inlays in segmenting, but over the years I noticed not all pickguard material is the same dimentions. What I mean is, I found that on some material and in this case I used black-red-black, the thickness of each piece is not the same. The company sandwiches 3 pieces and then must plane or sand one outside edge down to get the true end of the line dimention. Thus leaving one black piece a small amount thicker than the one on the opposite side. I have found a company that is pretty reliable to having exactly what I want and that is equal thickness of pieces. especially the 2 outer ones which tend to show more so. The company is http://www.warmoth.com/Blank-Pickguard-Material-C210.aspx


Hope this helps a little. I have another blank ready for turning that I hope to do sometime this week.


I think I may have misspoke. I should have said 45 degree angle cuts and not 60 degree. I hope this did not cause any problems for anyone even though they can be cut at any angle.
 
Last edited:
Been wanting to try one of those since I got the table saw for Christmas...thanks for the basic ideas, I like not being told everything but given the visual to get going!


Give it a shot Mason. By the way 60 degrees if you are wondering.


Here again I should have said 45 degree angle is what I used and not 60 degrees. But either one would work just that the cuts would be steeper which again would give another different look.
 
i ve been looking to try pickguard. thanks for the source . you use the .060 or .09?
 
Last edited:
John,
On your rig up above, it is only for making 45degree cuts correct? So you would have a separate jig for say a 60 or 25degree angle.
 
John,
On your rig up above, it is only for making 45degree cuts correct? So you would have a separate jig for say a 60 or 25degree angle.


Yes. That is correct. The reason I do this instead of an adjustable jig is for repeatability. It is always there. Can't throw it out of alignment:biggrin: 22.5 degree. :biggrin: These are some of the everyday angles we use in pen making and also other segmenting work. If i am doing something that needs other angles but I do not have a jig for it, I use my Dubby cutoff sled and that is completely adjustable.
 
Thanks John for this post. If I visualize the blank in posting #1 correctly there are seven (7) total cuts - four (4) straight and three (3) at a 45^ - right?

Thanks again for the much needed brain stimulus :)
 
Thanks John for this post. If I visualize the blank in posting #1 correctly there are seven (7) total cuts - four (4) straight and three (3) at a 45^ - right?

Thanks again for the much needed brain stimulus :)
My interpretation would be 8 total cuts - 4 straight & 4 at a 45° angle!

You just can't see the 4th angle cut!


I think you are right Mark. Thanks
 
Thanks again Mack. I am glad you are seeing some of these questions. I am having a bit of difficulty not only getting some shop time but also some computer time. We have a blizzard coming in tomorrow so who knows what power outage problems will come from this one too. Trying to anticipate things in 3 different houses to keep family up and running. Should be fun again. Sandy was a nightmare around here.

Anyway yes to the question. 4 and 4 I still have to spin that aluminum blank I had sitting in my jig that I had shown and I have another that should look cool too. Just playing around with this easy concept. Have a couple other ideas too but have not made the blanks yet.

Hey Mack how is the one you were working on coming along??? Can't wait to see it.
 
I've been wondering where to get pick guard too.. thanks for the photos, ideas and sources! Please keep posting and sharing your work.
Many thanks
Catherine
 
I use my Dubby cutoff sled and that is completely adjustable.
Hi John; A little off-beat here. Bought mine in Jan. '92 from In-Line Industries at a cost of $119.95


Hi Mack

I probably bought mine around then or maybe sooner. Then they had the stick-on mylar angle guide. I have since bought another one that has an improved metal guide because I liked it so much.

I got mine from them also at a woodworking show which should be coming to town very soon as a matter of fact. I go all the time to check out the latest gadets that I do not need to have but seem to buy
 
Last edited:
Hey Mack how is the one you were working on coming along??? Can't wait to see it.
Well, I have 3 on the go.

1 on a non-descrip piece of Maple, and 2 of Canary Wood.

I'm not pleased with the way my pickguard fits in the cuts, so I'm going to attempt to plane some Walnut strips to size.

Stay tuned!

I played with one this weekend and i to was not happy with the way the pick gaurd fit in the kerf. I measured the saw blade and pickgaurd thickness with calipers and it should have been a nice fit; but the kerf ended up slightly wider that the blade width.:confused: All I can figure is possibly a slight (I mean very slight) bit of blade wobble. I cut filler pieces from bubinga and sanded them to size with a Performax drum sander. I hope to try some more this week using pickgaurd.


Like I said, there is so very little waste and not much time lost doing these type segmenting. Sorry about the first try but at least you know what to look for next time. Could be blade wobble, could be arbor runout, could be the blade is not sitting properly on the arbor, could be a bent blade. Cut the blank and then match the infill to the kerf instead of taking readings with calipers to measure blades.

I will try to get that black and aluminum blank spun this weekend. I know there were some who asked to see it.
 
Thanks Max for the help on that.

I probably should not have said half way because if I were to cut half way on both the top and bottom rings the 2 halves would meet thus forming a complete ring. It was about 1/8" from the half way line. I made a center mark on the blank which divided the blank in half. I placed the blank next to the saw blade and lowered the blade so that it was about 1/8" below the mark. This is not critical but does affect the outlook. I keep all cuts the same.

Moishe

No router on this one. I used a 7-1/4" saw blade to make the cuts. It just so happened this blade was thin enough to fit the inlay material exactly. This is why I said this is such an easy segmenting project because all you need is a way to cut the slices. It can be done with a tablesaw which I did or even a bandsaw but the kerf would be alot thinner and thus the material for inlay will be thinner. Now of course you can increase the kerf on a bandsaw by just moving your stop block abit.


Here is the jig I used to make the angled cuts on my tablesaw. I think I posted this once before but I forget. The angles were cut at 45 degrees but any angle will do. The straight cuts obviously were cut with the miter gauge set at 90 degrees to blade.


45degreesledfortablesaw.jpg


One other note I would like to make mention of. Not sure how many people use pickguard material for inlays in segmenting, but over the years I noticed not all pickguard material is the same dimentions. What I mean is, I found that on some material and in this case I used black-red-black, the thickness of each piece is not the same. The company sandwiches 3 pieces and then must plane or sand one outside edge down to get the true end of the line dimention. Thus leaving one black piece a small amount thicker than the one on the opposite side. I have found a company that is pretty reliable to having exactly what I want and that is equal thickness of pieces. especially the 2 outer ones which tend to show more so. The company is Blank Pickguard Material


Hope this helps a little. I have another blank ready for turning that I hope to do sometime this week.


I think I may have misspoke. I should have said 45 degree angle cuts and not 60 degree. I hope this did not cause any problems for anyone even though they can be cut at any angle.


Did you ever post a finished pic of the black blank above with the aluminum inlays? Looks like it would be really cool.
 
No not yet. Just need to get some shop time. Have another to go with it also that I need to get done. It is a comparison type thing so I would like to have both done at the same time and then I will post them for an opinion. Hopefully by this weekend.:)
 
Back
Top Bottom