A Few More Coffee Mugs

Signed-In Members Don't See This Ad
See more from W.Y.

W.Y.

Member
Joined
Aug 10, 2008
Messages
1,656
Location
BC, Canada
I turned these five Sunday afternoon . Actually , I turned six but one blew up on the lathe . . . we won't go there . . . lol .
Turning is the quick part . It is the finishing that takes the time.
Sanding sealer and first coat of urethane on Sunday and the rest today (Monday).
One pine with some blue beetle kill coloring, two box elder and two catalpa.

Sorry about the picture. Couldn't make them sit straight sitting on the sofa.

FiveCoffeeMugs.jpg
 
Signed-In Members Don't See This Ad
I like them. I've got a kit under the bench that I've not tried yet.

What are the challenges in these? How do you hollow?
 
Hey Will, are those from the kits, or did you find some with the ss lining at the discount store and remove the plastic?

Nice either way though :)
 
Hey Will, are those from the kits, or did you find some with the ss lining at the discount store and remove the plastic?

Nice either way though :)

Those are from $5.99 mugs from the gas station.
I generally buy about ten at a time like this. Have not found the $4.00 ones like some have but still looking. Just remove the outer shell and use the stainless steel liner and lid which is identical to the $10.00 kit plus shipping from some of the on line suppliers.

ZipTripMugs.jpg


I like them. I've got a kit under the bench that I've not tried yet.

What are the challenges in these? How do you hollow?

Put a chunk of wood on the lathe and go for it. Not much of a challenge at all . Drill a hole with a forstner bit at about 200 to 250 rpm and use your favorite method of hollowing. I have tutorials on my own site with some differences of how it can be done but CSUSA and Woodcraft have general instructions on their site that help quite a bit for their $10.00 kits. .
Takes me an afternoon for half a dozen or so at a time but two or three in the same time should be easy enough if you have never turned them before. .
Mind you I am using a 18/47 two HP lathe . If you are using a mini or midi lathe you can expect to at least double your time but I turned lots of them on the smaller so called pen lathes before I upgraded to a big lathe .

Have fun and show a picture when you get it done.
 
Sweet! Thanks for the response.

Now a follow up..

How do you "remove the outer shell and use the stainless steel liner". Chick it up and part it off? Or is there a better method?
 
Sweet! Thanks for the response.

Now a follow up..

How do you "remove the outer shell and use the stainless steel liner". Chick it up and part it off? Or is there a better method?

There is a rubber type cover on the bottom that hides a screw . Scrape that off and take the screw out and give the outer shell a whack on the edge of the bench and it comes right off.
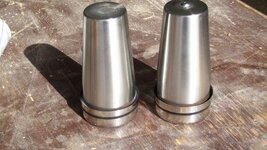
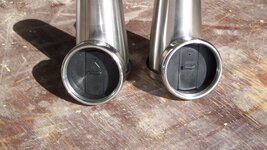
Here is what it looks like with the outer shell off.

MugLinerTop.jpg


MugLinerBottom.jpg
 
just thought I'd pass this along if anyone is looking for some.....
I was in the local Shopko (not sure if all states have them, just like K-Mart) and found mugs on sales for $1.99 !!!!! I thought they were probably plastic - nope. I bought a few and went home, took them apart (very easy) and set it next to the one I bought at WC for $9.99 last week. I could not tell the difference.

Awesome find on those . Best price I have heard of.
Could you please post a before and after picture . ? Outer shell on and outer shell off and lid ?
 
Here you go....

Here you go....sorry about the bad pic.
Hopefully you can see the price tag also. I put a magnet to the insert - stuck like glue. The bottom piece on the right just screws off and you wiggle out the insert. The top is on the front left. It was at the West Jordan Shopko on 9000 S. and Redwood.
Cheers
Bob
 

Attachments

  • 100_0275.JPG
    100_0275.JPG
    81.7 KB · Views: 156
Here you go....sorry about the bad pic.
Hopefully you can see the price tag also. I put a magnet to the insert - stuck like glue. The bottom piece on the right just screws off and you wiggle out the insert. The top is on the front left. It was at the West Jordan Shopko on 9000 S. and Redwood.
Cheers
Bob

Thanks for the picture.
A picture is worth a thousand words.
It is somewhat different from the ones I have received in the past from Woodcraft and CSUSA where the ones I am using are identical. Probably made in a different factory in China.

Looks like yours had a screw on bottom and leaves a larger threaded piece on the bottom but that is not a problem. You can just make the inside of the wood part a little deeper and push that part into high heat silicone in the bottom.
The lid is very similar but not identical to the ones I am using.

Let us know how you make out with turning some wood exteriors for those and please show pictures of some all finished off.
 
Was in PetSmart the other day and they had mugs like those on close out for $2.49
One question William, what tool do you prefer to do the hollowing?
Thanks for the tutorial.
Mike
 
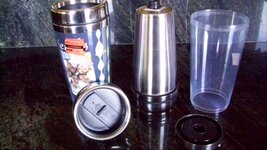
Side by side......$1.99 mug on the left minus the screw that you referred to that pops off with ease, WC $9.99 on the right, same with the lids.

For $8, they are close enough for me.......I can spend the $8 on some wood.

Now to wrap some wood around them. Wish me luck.
Cheers
Bob
 

Attachments

  • mugs 1.JPG
    mugs 1.JPG
    85.8 KB · Views: 134
  • mugs 2.JPG
    mugs 2.JPG
    92 KB · Views: 112
Side by side......$1.99 mug on the left minus the screw that you referred to that pops off with ease, WC $9.99 on the right, same with the lids.

For $8, they are close enough for me.......I can spend the $8 on some wood.

Now to wrap some wood around them. Wish me luck.
Cheers
Bob

Ah Ha . . . so were able to remove that bottom piece with the threads on it . Way to go . Was it just glued on ?
As you know the ten dollar ones from suppliers and the ones like I got from a gas station have the part that the screw goes into spot welded on.

Looks like you got a heck of a good deal .

Looking forward to see mugs you make with them.


One question William, what tool do you prefer to do the hollowing?
Thanks for the tutorial.
Mike

I use nothing but a forstner bit and a home made long and strong and sharp straight across chisel end scraper .
For the outside a gouge and skew as well as the parting tool for the tenon where the wood fits under the rolled edge of the liner.
The inside does not need to be fancy at all . It gets covered up. I don't sand the inside but make sure it is well sealed with polyurethane or whatever is your choice of sealing.
 
Back
Top Bottom