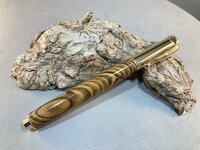
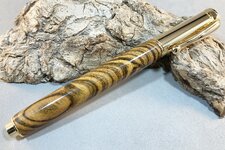
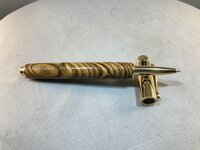
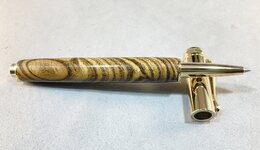
Radial Grain Bocote with Artisan Jr. Zen

Signed-In Members Don't See This Ad
See more from KMCloonan

KMCloonan

Member
Joined
Jun 13, 2017
Messages
1,622
Location
Round Lake, Illinois
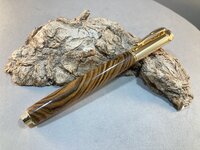
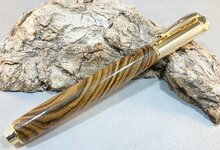
I'm pretty happy with how this pen turned out, but I'm not as pleased with how I got here.

This radial Grain Bocote is beautiful, but's a terror to drill into. I ruined 3 blanks trying to drill a straight hole. The bit wants to follow the grain, and I end up with several angled blanks. With this blank I was fortunate to have enough "meat" on the thin side to turn it round.

I used regular drill bits, not brad point. My bits are sharp. I even tried using a center bit to start the hole, and that did not help.

I will probably stay away from this kind of blank in the future.

Any comments, advice or critiques are welcome.

004.JPG
005.JPG

006.JPG
 
Signed-In Members Don't See This Ad
I use those short machinists drill bits to start. I then switch to a regular drill bit. It has happened to me too when I just use the drill bit. Beautiful pen!
 
I'm pretty happy with how this pen turned out, but I'm not as pleased with how I got here.

This radial Grain Bocote is beautiful, but's a terror to drill into. I ruined 3 blanks trying to drill a straight hole. The bit wants to follow the grain, and I end up with several angled blanks. With this blank I was fortunate to have enough "meat" on the thin side to turn it round.

I used regular drill bits, not brad point. My bits are sharp. I even tried using a center bit to start the hole, and that did not help.

I will probably stay away from this kind of blank in the future.

Any comments, advice or critiques are welcome.

View attachment 377356View attachment 377357
View attachment 377358
Not withstanding your issues, the final pen is beautiful. I love Bocote grain, and crosscut holds a special appreciation. Well done!
 
As much as drilling was a pain, it came out beautifully! I love how it came out with that grain orientation.

To be fair, that's a long blank, though. A shorter barrel and a stubby bit would probably play nicer for you.
 
I agree completely with Todd (sorcerertd) about the stubby bit as it is more rigid. Rigidity is one of the keys in trying to keep a drill from wandering when drilling into the end grain of a wood blank. For problematic woods instead of using my Jacob's Chuck in the tailstock for holding the drill bit (standard twist, 135 degree point angle), I opt for mounting the bit in my Collet Chuck.

For especially problematic materials, I like to drill an initial hole using a Screw Machine Drill Bit (Stubby Bit) as deep as I can go to make a guide hole and then finish drilling a Jobber Bit. (Again, this goes to rigidity). Of course, I also make a starter hole with the shortest bit there is, a Center Drill Bit. I usually drill at 500 RPM to 750 RPM for typical pen diameter drill bits.

Regards,
Dave

PS Bocote is right up there in my Favorite wood category and it made a stunning pen.
 
I'm pretty happy with how this pen turned out, but I'm not as pleased with how I got here.

This radial Grain Bocote is beautiful, but's a terror to drill into. I ruined 3 blanks trying to drill a straight hole. The bit wants to follow the grain, and I end up with several angled blanks. With this blank I was fortunate to have enough "meat" on the thin side to turn it round.

I used regular drill bits, not brad point. My bits are sharp. I even tried using a center bit to start the hole, and that did not help.

I will probably stay away from this kind of blank in the future.

Any comments, advice or critiques are welcome.

View attachment 377356View attachment 377357
View attachment 377358
Just wow
 
May be you can try a series of bits leading to the final size . I do it as a regular practice and get very precise holes and a nice fit for the tubes without any oval it's or wobble.
Thanks Mohan - I tried this, using a smaller bit first, but it also went astray and created an angled hole.

I also drill some blanks with small diameter drill bits and gradually increase the bit size - I do this especially with Tru-Stone blanks.
 
I'm pretty happy with how this pen turned out, but I'm not as pleased with how I got here.

This radial Grain Bocote is beautiful, but's a terror to drill into. I ruined 3 blanks trying to drill a straight hole. The bit wants to follow the grain, and I end up with several angled blanks. With this blank I was fortunate to have enough "meat" on the thin side to turn it round.

I used regular drill bits, not brad point. My bits are sharp. I even tried using a center bit to start the hole, and that did not help.

I will probably stay away from this kind of blank in the future.

Any comments, advice or critiques are welcome.

View attachment 377356View attachment 377357
View attachment 377358

The pen looks great. but I have to say your photos are some of the very best shown on this site. Would it be possible to give a little insight as to your method? maybe show us your setup and tell us what you have found to be the key to such successful picture taking. Thanks in advance.
 
The pen looks great. but I have to say your photos are some of the very best shown on this site. Would it be possible to give a little insight as to your method? maybe show us your setup and tell us what you have found to be the key to such successful picture taking. Thanks in advance.
Thanks for the kind words, John, but I don't really have what I consider to be a benchmark process. I'll explain.

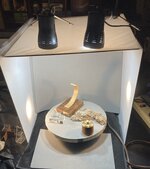
I use a basic, normal photo booth like you can get on Amazon. I have 2 lights facing down to provide overhead light. I also have 2 dimmer LED lights, one on each side to try to provide more light. See pic below.

Photo booth.jpg

I do use light gray foam sheets for my background, as grey is supposed to be neutral. I have received feedback that some folks with varying degrees of color blindness can't easily make out things in my photos. I'm not sure what I can do for that.

Anyway, I use my iPhone SE (so it's not even a fancy phone camera).

I think what makes or breaks it for my photos is the editing, not the actual photography. I think any photographer could relate to this.

Below, I have the original pics for this Bocote Pen on the left, and then the edited photos on the right. You will see that the edited photos all look much better than the originals.
Pen1.jpg Pen1a.JPG

pen2.jpg Pen2a.JPG

pen3.jpg Pen3a.JPG

Obviously, one main edit I do is cropping, to remove things that are not the pen.

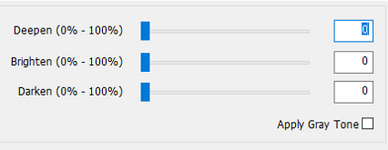
I then look at the brightness, or darkness, and increase or decrease as needed. There is also a parameter called Deepen, which sometimes brings out more of the color in the pen. I don't use it all the time, but sometimes it helps.

photoscape.png

I DO NOT edit the pen beyond reality. I don't augment the color, or sharpen the image, or any of that. I just try to make the photo look like the pen. You don't want a customer to buy a pen only to find out the actual pen looks nothing like the photos.

I use a photo editing software called PhotoScape. I have had it for at least 15 years. There are many photo editing tools out there.

Anyway, my process is nothing special. I do appreciate the comments though, because I do fuss with the photos until I like what I see, and I am glad others can appreciate the photos too. :)
 
Kevin thanks for the explanation and the photos. Whatever it is you are doing , continue because they are some of the best photos showing up here. Again nice job with the pen also.
 
Back
Top Bottom