Kenny Durrant
Member
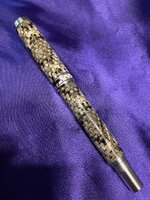
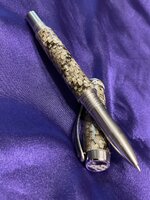
First one finally finished. About the pen. First off all snakes have tails. Some have rattles attached to it. This is a Western Diamondback Rattlesnake Skin. Most people don't know that their tails are black and white. I've always wanted to try the custom center bands and finials but never had the confidence to give it a try. After watching John U.s videos I thought why not! You have to admit he made it look so easy. Anyway I have several pieces of the tail skins but they're too small for most projects. When I saw this kit I thought this would be the perfect use for them. The main pen body is the main pattern from the back of the snake. The center band and finial is the skin from the black and white tail. I'm very pleased with the finial but the center band looks too busy and out of place. As far as the process went I'm definitely no John U. During his center band video he used paper to build up the groove for the CB. He said to use CA and not Elmers. Since I love Elmers I took that comment to heart. I used it anyway and on the 3rd time starting over I use CA. I don't know if the 3rd times a charm or I'm too stubborn to follow directions the first two. On the finial I only had to clean out the CA and refill it once. Back to John's video he said to fill it with small layers. Well you can't do small layers of thin CA right out of the bottle. Of course as soon as I tilted the bottle over the cap it filled it immediately. It looked good so I let it go. When I sanded and polished it there were a few bubbles. That's when I was able to use Acetone and a paper towel to clean it out and use a straw to dip the CA into the cap in small layers. Once doing that it was super easy. Overall I'm pleased with the outcome and happy to have tried the custom accents. I have a few more kits to play with so I'm working on a few more ideas. Thanks to Ed at Exotic Blanks for coming up with a quality kit to cater to this type of pen making. Thanks to John U. for taking the time to make the videos and share his procedures. Questions and Comments are Welcome.


