How much is too much?

Signed-In Members Don't See This Ad
See more from amtechrs

amtechrs

Member
Joined
Feb 6, 2024
Messages
108
Location
Yoncalla, OR
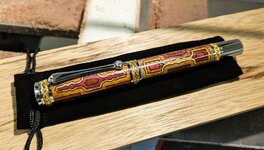
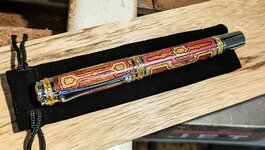
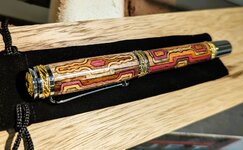
Just finished another segmented rollerball pen, using my laser for cutting the components. I don't know, maybe it's too busy? Too many woods? I used Hawaiian Koa, Black Limba, Purpleheart and Canarywood. I'm on the fence with this one... It's very similar to one I posted in the blank making / segmenting forum, but I added a species and a few little round bits.
 

Attachments

  • PXL_20240213_223722458.jpg
    PXL_20240213_223722458.jpg
    278.3 KB · Views: 237
  • PXL_20240213_223803941.jpg
    PXL_20240213_223803941.jpg
    345.2 KB · Views: 233
  • PXL_20240213_223854202.jpg
    PXL_20240213_223854202.jpg
    298.1 KB · Views: 237
Signed-In Members Don't See This Ad
That's freaking great work. Nice job.

In response to your question, I'll plug in with my opinion for the extremely limited value it provides as it's an opinion and not based in any fact. I prefer pens to have a design that I can see or understand without having to rotate them. The design you're showing for this pen is very visible without having to rotate the pen to see it all. There may be others who have a different opinion. I think it's somewhat in the eye of the beholder.

You're pushing your (our?) craft with designs like this to see what can be done. Have at it.
 
Very nice. I'll chime in with my opinion as well. I do a lot of image casting. I try to keep the image as visible as possible without rotating to see it. I like the way you kept the patterns on one side. It might be a little busy but not in a bad way. IMHO. You can see what's going on without getting dizzy or holding the pen at different distances to see what's there. With that in mind I'd say colorful instead of busy. I'm not only impressed with your laser work but your creativity as well. Thanks for sharing.
 
Thank you all for your kind words! The 'opinion' of not having to turn the pen resonates with me, now that you mention it. On the heals of that, the next blank I'm experimenting with is going to be a 'strand' of orange weaving around the purpleheart blank this way and that....šŸ˜„
 
As a "segmenter", I love what you have done! I do not find it 'too busy,' although your are pushing the limits šŸ¤£ .

The patterns are excellent and precise, so no issue there. The choice of timbers are great as they contrast nicely to highlight the design. In summary - well done! Thanks for sharing.
Oops! I meant to make a separate post, not to reply to this post.
 
I think it is simply fantastic. It really makes me want to start saving up my allowance so I can buy a CO2 laser. The company I worked for had about 200 Lasag pulsed KLS-246 and FLS-N Nd:YAG lasers (250 to 350 Watts). We also had a few Lumonics LaserMark 950 CO2 lasers for high speed marking (at 12 marks per second). They were of course industrial lasers, much larger than what is needed for cutting wood to make pen blanks.

Your blanks are very - very nice! - Dave
 
Really nice. For me... and only my opinion which isn't worth that much. If I'm going to use and fancy kit with lots frills and movement, I will use and less moving pen blank. And vice-versa. Beautiful barrels like that I would have used a simpler kit... Maybe a Jr. Gent? It's kinda like these great slab tables people are making today. Either have the top be the center of attention or the legs. Can't be both.
 
For what you are doing and the tools you are using it does look good. I will say though the base wood does get lost. I would keep to 2 sides and not 4. It is a small canvas you are working with. Your designs of the curves and boxes works well. Your particular taste and ideas are now starting to show us how you think because just about all your designs have a certain flavor. This is just a matter of perception. I know I tend to have a certain style myself and catch myself every time I design something but we are who we are. Keep up the good work.
 
I do like it, but agree with the comments around the ornate pen kit with the very detailed blank. I'd tune one or the other down a bit. One thing that I think makes this one work is that the Majestic kit is massive, so in the pen world, it is a large canvas. Nice work. Can't wait to see what you do next.
 
Don't second guess yourself. Your design work is beautiful and the end result is fantastic. I do, however, agree with PreacherJon that the design of the pen blank is ornate enough that the ornate kit competes with it too much. A simpler kit would work better. I like the addition of another wood in the design. I've never seen anything like these pens, so you are a trailblazer in the field. Congratulations! PS: Don't forget to enter one in the BASH if it's still open.
 
Wow, thank you all! I now understand why I thought this design might have been too much, it was the kit that pushed it over or just didn't exactly compliment it. I really appreciate all the kind words and insights! Now, I'm going to post my latest (3am rabbit-hole) experiment in the segmenting blank making forum... See what you think, it's a bit of a departure.
 
I think it's marvelous. You created an Medieval design from your own imagination and took it to a wonderful level of craftsmanship as well. Looks like a pen that a monk in the Escorial would be very proud of!
 
My reaction is, wow! Very impressive.

Yes, it is busy, but lots of cast blanks are, also.

It reminded me of baroque art where there are lots of visual elements. Some prefer minimalistic blanks and grains, while others prefer lots of wild figure, colors, and patterns.
 
That is an awesome pen. Did you use a rotary when lasering out the pieces? I ask this because I do not see any seam lines in the pictures you posted. If so I am guessing you had to drill four different 12.5mm and 10.5mm blanks, and then turn each of them between centers (without brass tube) to about a 1/8 inch wall thickness, before cutting each of them on your laser. Just a guess on my part on how you did it. Regardless, I am in awe of your patience and artistry. Well done, sir.
 
I think it looks great! You have a well defined pattern with woods the provide enough contrast while complimenting each other at the same time. Your design kind of reminds me of the Gisi designs where the designs have a lot going on, but there is enough order to it that makes the design work. Well done!
 
That is an awesome pen. Did you use a rotary when lasering out the pieces? I ask this because I do not see any seam lines in the pictures you posted. If so I am guessing you had to drill four different 12.5mm and 10.5mm blanks, and then turn each of them between centers (without brass tube) to about a 1/8 inch wall thickness, before cutting each of them on your laser. Just a guess on my part on how you did it. Regardless, I am in awe of your patience and artistry. Well done, sir.
he is using a different approach to segmenting these if you read his last thread. He shows photos of what he does and basically he is doing these on a flat surface. He cuts 4 sides and basically build a small box and they fit together like puzzle pieces. and then drips CA in to lock things together and then drill for tube. Pretty clever and save on needing rotary equipment. To me a much better system but each method allows for details that one or other can not. Check it out.
 
he is using a different approach to segmenting these if you read his last thread. He shows photos of what he does and basically he is doing these on a flat surface. He cuts 4 sides and basically build a small box and they fit together like puzzle pieces. and then drips CA in to lock things together and then drill for tube. Pretty clever and save on needing rotary equipment. To me a much better system but each method allows for details that one or other can not. Check it out.
Thanks, John. I missed that, however, my two dimensional mind is still having difficulty in grasping his process.
 
Thanks, John. I missed that, however, my two dimensional mind is still having difficulty in grasping his process.
I did too until I saw the photos and it is quite simple. He is building a laser cut out pieces and putting together as a flat puzzle. When he joins the sides they actually have tabs on them that easily slip together as he builds a 4 sided box. But those tabs are part of the design.

https://www.penturners.org/threads/laser-segmenting.180556/#post-2211418
 
Great job there. Are the black lines just glue then? It's very precise. Colored CA?
Thanks Todd! Yes, the black lines is just clear CA, actually. It seems to pick up the black from the edge burn from the laser. I'm going to experiment with filing the burn off and see if that reduces the black lines for certain applications....
 
Thanks Todd! Yes, the black lines is just clear CA, actually. It seems to pick up the black from the edge burn from the laser. I'm going to experiment with filing the burn off and see if that reduces the black lines for certain applications....
I've never tried this with any laser segmenting, but perhaps the strategy of adding CA to the sandpaper to work up a slurry to fill the gaps would give the colors a more tight transition? I sometimes to that to fill thin cracks and I was thinking of attempting this method sometime in the near future with a lasered blank.
 
Great job there. Are the black lines just glue then? It's very precise. Colored CA?
Thought I'd expand on this a bit. The laser kerf, thus cut edge of the wood, is not square. Especially on thicker material, it tapers in slightly at the bottom as the energy of the beam dissipates. I offset the geometry of the pattern to accommodate for the kerf, so the cutout inside of a panel is offset to the inside, while the piece that fits into that cutout gets offset outside. The amount I offset results in the pieces fitting fairly snug at the bottom surface and a slight gap at the top, which works well for wicking the CA into. The resulting black line seems to make the results pop more, for sure. You could offset the geometry a little more, with symmetrical designs, and alternate top and bottom between the pieces to make a sort of wedge fit, but the CA won't wick. Well, now that I say that, I haven't tried thin CA. I've only used medium.... Hmmm....
 
Really nice. For me... and only my opinion which isn't worth that much. If I'm going to use and fancy kit with lots frills and movement, I will use and less moving pen blank. And vice-versa. Beautiful barrels like that I would have used a simpler kit... Maybe a Jr. Gent? It's kinda like these great slab tables people are making today. Either have the top be the center of attention or the legs. Can't be both.
Hi Robert, thank you for the suggestion on the Jr. Gent kit. (II) I have a few on order! I've started to design the 'box/blank' for those, but I don't know the length of the tubes. Most instructions include that, but I'm not finding that detail anywhere, even the replacement tube section. Do you happen to know the exact length of the tubes? If not, I'll just have to practice some patience (hard for me) and wait for them to arrive...
 
Back
Top Bottom