Jury is out - something new

Signed-In Members Don't See This Ad
See more from mmayo

mmayo

Member
Joined
Jan 12, 2013
Messages
3,081
Location
Tehachapi, CA
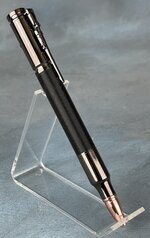
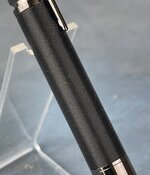
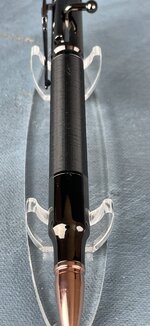
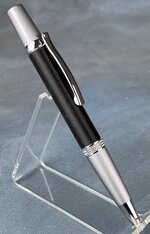
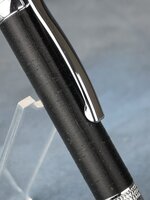
This blank was 3D printed in black resin. After a few trials to get the dimensions just right, the brass tube very tightly fits inside the 3D printed tube and the outer diameter matches the kit. The fit is tight enough that no glue was used and the pen was pressed together. Not likely to move since the fit is from the brass tube and the hardware does not allow movement.

I'll see if it grows in me. Definitely different and definitely easy. It takes 40 minutes to print.
 

Attachments

  • IMG_3991.jpeg
    IMG_3991.jpeg
    254.6 KB · Views: 229
  • IMG_3992.jpeg
    IMG_3992.jpeg
    261.4 KB · Views: 232
  • IMG_3993.jpeg
    IMG_3993.jpeg
    184.9 KB · Views: 207
  • IMG_3994.jpeg
    IMG_3994.jpeg
    197.4 KB · Views: 253
Last edited:
Signed-In Members Don't See This Ad
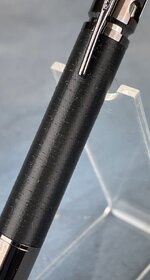
I think it looks cool. When I was looking closely at it (before I read your post), I thought it was a thread wrap, like they have for fishing rods. Do the layers of 3d resin give the pen more grip? It looks like they might.

Anyway, this juror gives a thumbs up! :)
 
Sold it! Jury votes yes now. Costs less than a blank with relatively no work now that the design is correct.

The blank was made layer by layer from the bottom of the cylinder to the top. It does feel grippy!
 
This defeats the purpose of why most of us make pens but it could be good for thoughts that sell pens as a cheap easy sale item.
 
This defeats the purpose of why most of us make pens but it could be good for thoughts that sell pens as a cheap easy sale item.
I do all of what you do too with exotic wood and great acrylic. This is something new and will sell. I don't like to get stuck in a rut with my shop. If nothing new it is time to find something better or different.

As for cheap, the pen sold yesterday for $50. It was EASY. That works for me.
 
Well the results you've show us over the years exemplify your excellence at turning / creating.

For me the jury is out but it does look very intriguing. Thanks for the comment as to grip and feel as that would be my first question. not sure I'd like it with a gloss finish though the semi matt given by the layers adds to its attraction to me.

Anyway that's just my views on it and everyone's entitled to an opinion . I'm sure you will keep us updated but best wishes as you experiment đź‘Ť
 
I do all of what you do too with exotic wood and great acrylic. This is something new and will sell. I don't like to get stuck in a rut with my shop. If nothing new it is time to find something better or different.

As for cheap, the pen sold yesterday for $50. It was EASY. That works for me.
By cheap I was referring to labor and materials but I guess I don't really know about materials. What's the cost to print a tube?

I turn pens to turn pens so I have no interest in printing them plus I don't sell. When pens get old I turn other things, right now I'm on an ornament kick. Hoping the wife will get used to the bowls setting around the house and won't notice a couple more.
 
Interesting! I imagine you could do quite a lot if you could use multiple colors of filament.

Curious if you can optimize the printing process to not leave the little "threads" on the blank?
 
Interesting! I imagine you could do quite a lot if you could use multiple colors of filament.

Curious if you can optimize the printing process to not leave the little "threads" on the blank?
You can hit the blank with a heat gun to remove some threads. I'll try it on the two I made today. The printer randomly starts each layer so you see a slight nub where that occurs. I could force it to line those up like a zipper.
By cheap I was referring to labor and materials but I guess I don't really know about materials. What's the cost to print a tube?

I turn pens to turn pens so I have no interest in printing them plus I don't sell. When pens get old I turn other things, right now I'm on an ornament kick. Hoping the wife will get used to the bowls setting around the house and won't notice a couple more.
Probably 5 cents to print a tube like this with little wall thickness. I printer two diamond knurl ballpoints/Sierra pens today with even less wall thickness.

We will see if others like the result and buy more. We sell at the Gallery n Gifts in our town and manage $1,000 or more in non Christmas months. The variety of people that visit our town mean to me that to sell you need stuff a guy in their town can't or won't make. I plan to be the guy with the sale.

I'm retired and this woodworking and pen making effort has filled my shop with lots of premium machines, buys my ridiculous pellet guns, pays for my propane bill, pays for long range fishing trips and equipment etc.

Good luck with your bowls.
 
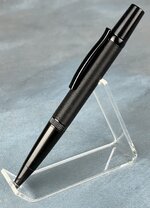
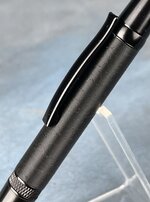
Two more. This time I tried the very thin diamond knurl ballpoint/Sierra pen body. The cylinder of extruded plastic had a very thin wall as expected, but it worked. The tube goes in quite firmly and does not want to move once installed. Photos below. It indeed looks like threads are hand wrapped around the tube like fishing rods. I fish so that it a plus to me.

After selling the first 3D printed bolt, I made two more in black and again in gun metal.

This will by no means replace beautiful burl wood or interesting acrylic, but the right buyer will pick them up and no let go.
 

Attachments

  • IMG_3995.jpeg
    IMG_3995.jpeg
    216.4 KB · Views: 93
  • IMG_3996.jpeg
    IMG_3996.jpeg
    238.5 KB · Views: 98
  • IMG_3997.jpeg
    IMG_3997.jpeg
    290.3 KB · Views: 102
  • IMG_3998.jpeg
    IMG_3998.jpeg
    250.5 KB · Views: 99
This is very interesting, I started printing pens with the thought of doing an abalone warp. I have printed in blue PLA and various wood infused PLA. It was fun using TINKERCAD to generate the designs, lengths and size for the "turnings" for each type of pen ( slimline, K9, Patriot, Baseball etc) . One the design were done I printed them on an Ender 2 Pro ($199) with a wood infused (30%) PLA filament. I tried various sizes of Abalone inlay areas from 20 mm to 35 mm long. My worst problem was get the ends to a size equal to the diameter of the items being pressed
into it. Like you I found that with proper specifications the brass tubes could be inserted so tightly that glue or adhesive was not required.
I would then take Abalone sheets that would match well with the shades of the "printed barrels" and cut them on my laser. I used a stitching cut to "cut" the line, 1mm cut skip 2mm and repeat (it is a setting in printing software LightBurn). Power was adjusted so as to cut the abalone without cutting through the backing . Once Abalone was cut, I wrapped it in the insert area of the printed barrel. Unlike Mark I would then add a layer of UV resin and cure it in a Resin Printer Washer/Curing station for 20 min. I would then wet sand using the micro pads from 320 to 3500.
I would repeat this process until I had covered the Abalone and sanded 3D printed barrel. Once it was Smoothed and Sized I added 2 light coats of Gluboost filler CA and then followed by 2 coats of thin CA. This last step caused me a lot of grief until I learned not to use excessive accelerator.

K9 pen shown below (brown is the 3D printed part and green is Abalone)
image0.jpeg
 
Last edited:
Two more. This time I tried the very thin diamond knurl ballpoint/Sierra pen body. The cylinder of extruded plastic had a very thin wall as expected, but it worked. The tube goes in quite firmly and does not want to move once installed. Photos below. It indeed looks like threads are hand wrapped around the tube like fishing rods. I fish so that it a plus to me.

After selling the first 3D printed bolt, I made two more in black and again in gun metal.

This will by no means replace beautiful burl wood or interesting acrylic, but the right buyer will pick them up and no let know
You know I like the look of that one even more Mark !
 
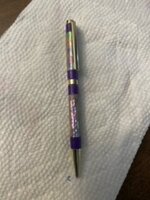
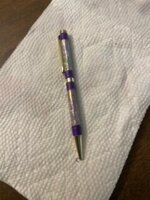
Latest pen made for my son's birthday. Used purple filament and cream abalone
 

Attachments

  • image0.jpeg
    image0.jpeg
    16.3 KB · Views: 83
  • image2.jpeg
    image2.jpeg
    17 KB · Views: 80
Back
Top Bottom