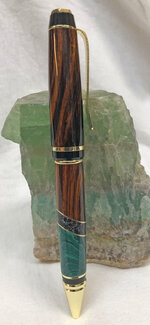
Simple Segmented - Ironwood - Malachite - Black Marble

Signed-In Members Don't See This Ad
See more from egnald

egnald

Member
Joined
Jun 9, 2017
Messages
3,765
Location
Columbus, Nebraska, USA
Greetings from Nebraska.

Today I finally turned a segmented blank that I have had laying around for a few months. It is a gold Cigar pen and the blank was made of simple diagonal segments of Malachite SimStone, Black Marble SimStone, and Sonoran Desert Ironwood all separated with some pieces of brass. I think it might have looked better with just a solid black piece of Ebony rather than the Black Marble that has the little white lines in it. I turned it using the custom Cigar bushings from ed4copies (Exotic Blanks) and finished it with my standard CA regimen. I installed a Blue-Black Monteverde Parker Style GEL Refill - Broad point and will be making this one of my every day carry pens.

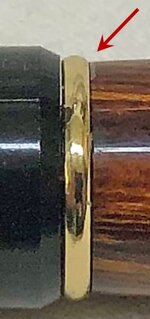
I really like the fit between blank and the top (transmission) coupler on the lower section from Ed's improved bushing design.
IMG_2753 Cropped Zoom.jpg

Regards,
Dave

IMG_2749 Cropped.jpg

Pictures showing the grain as the pen was rotated:
IMG_2751 Cropped.jpgIMG_2752 Cropped.jpgIMG_2753 Cropped.jpgIMG_2754 Cropped.jpg
 
Last edited:
Signed-In Members Don't See This Ad
Wonderful pen, Dave!! I am a particular fan of the trustone/simstone stuff, and I really love how well these blend with your choice of wood. I also appreciate the closeup of the fit with the transmission coupler. Lot of pens (well, their bushings) aren't designed right for the inside diameter of convex parts like that.
 
That's a great looking pen and the combination of materials make it well done.
 
How did you attach the brass? It seems every time i do a diagonal with brass the brass always delaminates when I drill it out.

I make sure the brass is flat - I cut it carefully to keep it flat, but sometimes I get a little curl or warping so I just hammer it on a flat spot on my vise.

I scuff both sides of the brass with about 150 grit sandpaper much as one does for brass tubes. I also scuff the surface of the wood or SimStone with sandpaper as well. Some woods, especially very hard woods like Ironwood and Ebony can almost burnish when they are being cut. The shiny surface doesn't adhere well, so I scuff it up to give it some tooth for the adhesive to grab onto.

I clean the brass and mating surfaces to make sure they are oil free by wiping them with denatured alcohol.

Although many would say the best adhesive is a "long cure time" epoxy, I only keep the 5-minute type on hand. Usually loctite or clear JBWeld. I simply smear it on the surfaces and press the parts together with very light clamping force. I think some folks tend to over-clamp which can reduce the adhesion by squeezing out too much of the glue. That and I usually have a dickens of a time trying to keep parts lined up when I apply clamping force because the epoxy makes every surface slippery.

I either saw or sand the edges of the blank after the epoxy has cured so that I have a nice uniform blank for the jaws of my drilling vise to grab onto. I think the clamping pressure of the jaws also gives the blank a little extra strength/support while I am drilling.

When I drill, I make sure I have a very sharp drill bit. I have been successful with sharp high speed steel bits, but if I have the necessary size I use a carbide twist drill (I know it is sharp). The cutting geometry of brad point drills will most certainly tear things up, so use a standard 135-degree ground drill. It would probably be even better if you have a 118 degree drill because it has a more aggressive point and a smaller chisel or a drill sharpened for plastics and laminates with a 60 to 90 degree grind and a zero-degree rake angle on the cutting edge to help prevent "grabbing".

I drill using a small pecking type of process, drilling no more than 1 to 1-1/2 the bit's diameter in depth for each iteration and I allow plenty of time for the bit and blank to cool between pecks, especially as the hole gets deeper. I usually apply BladeCote (DriCote) as a lubricant to my bits as well, although I don't know if it has any significant impact on my success or not - it is just a habit.

Honestly, I don't know how critical any of the steps are, but it is how I do it and I appear to have a pretty good success rate. (I blow out more wood blanks than I do segmented ones. I think it is because I get impatient and let the bit and blank get too hot).

Dave
 
You can always drill the segment parts first and glue them to the tubes, that helps, more time though, and you should have extra tubes on hand if you go that way.
 
I do every step except I don't use epoxy. I will try that, but i think part of my issue is the drill bit. Thanks so much for your advice!
I am pretty sure that the sharper the bit the better. When I was starting the first couple of blanks blew apart when I was drilling them (even drilling them carefully on the lathe). I had a couple 10mm bits that came with starter sets that I had never used, so on a whim I decided to try one of them out as I assumed it would be the sharpest it could be having never been used before and viola I was able to drill without incident. Maybe it was a fluke, but ever since I have had good fortune as long as the bit has been very sharp. - Dave
 
I am pretty sure that the sharper the bit the better. When I was starting the first couple of blanks blew apart when I was drilling them (even drilling them carefully on the lathe). I had a couple 10mm bits that came with starter sets that I had never used, so on a whim I decided to try one of them out as I assumed it would be the sharpest it could be having never been used before and viola I was able to drill without incident. Maybe it was a fluke, but ever since I have had good fortune as long as the bit has been very sharp. - Dave
Yeah and most of my bits are brad point, and even on aluminum they seem to blow apart sometimes. But only when its at an angle.
 
Back
Top Bottom