Sylvanite
Member
While it's generally a good idea to compose a photo in the viewfinder, there are times you wind up with extraneous area around your subject. Here is an example.
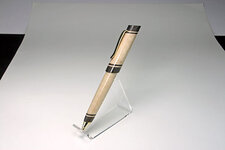
This photo has a couple of big problems. First of all, the pen is primarily vertical in orientation (which is called "portrait"), but the picture is wider horizontally (called "landscape" format). This wastes a lot of space and makes the pen look relatively small. Second, the background is not uniform. The missing sections of backdrop distract from the pen. The solution is to crop the image.
Click on "Image->Crop", or click on the "Crop Tool".
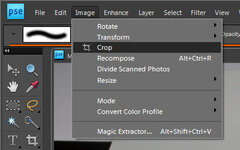
Now we need to choose the "aspect ratio". This is just ratio of the width to the height, not the actual size of the image. One can choose a common value from the Aspect Ratio drop-down box, enter a custom ratio, or select no restriction at all. If, for some reason, you want your final image to have specific dimensions, (such as 400 by 600 pixels), set the ratio accordingly. This is useful for getting photos to line up on a web page, print the right size on photo paper, of if you simply like round numbers. In this case, I've chosen a width to heigh ratio of 4:6.
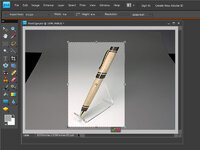
Drag the mouse pointer from one corner of the desired crop to the opposite corner. The crop area will be highlighted. Don't worry if it doesn't come out exactly right. You can adjust the corners or the center by dragging them.
When you are satisfied with the results, click the green checkmark at the bottom of the crop area.
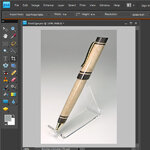
That's it! The extra area is gone. Only the subject remains. It occupies the entire frame and is in the correct orientation. Overall, it is a much better composed photo.
I hope that helps,
Eric

This photo has a couple of big problems. First of all, the pen is primarily vertical in orientation (which is called "portrait"), but the picture is wider horizontally (called "landscape" format). This wastes a lot of space and makes the pen look relatively small. Second, the background is not uniform. The missing sections of backdrop distract from the pen. The solution is to crop the image.
Click on "Image->Crop", or click on the "Crop Tool".

Now we need to choose the "aspect ratio". This is just ratio of the width to the height, not the actual size of the image. One can choose a common value from the Aspect Ratio drop-down box, enter a custom ratio, or select no restriction at all. If, for some reason, you want your final image to have specific dimensions, (such as 400 by 600 pixels), set the ratio accordingly. This is useful for getting photos to line up on a web page, print the right size on photo paper, of if you simply like round numbers. In this case, I've chosen a width to heigh ratio of 4:6.

Drag the mouse pointer from one corner of the desired crop to the opposite corner. The crop area will be highlighted. Don't worry if it doesn't come out exactly right. You can adjust the corners or the center by dragging them.
When you are satisfied with the results, click the green checkmark at the bottom of the crop area.

That's it! The extra area is gone. Only the subject remains. It occupies the entire frame and is in the correct orientation. Overall, it is a much better composed photo.
I hope that helps,
Eric
