
You are using an out of date browser. It may not display this or other websites correctly.
You should upgrade or use an alternative browser.
You should upgrade or use an alternative browser.
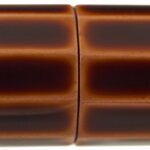
Challenge: how to make octagonal pen's cap and barrel close w/ lines "straight"
- Thread starter carandacher
- Start date
Signed-In Members Don't See This Ad
Signed-In Members Don't See This Ad
Ed McDonnell
Member
You would need a quad, double or single threaded connector. With a triple thread you have a better than even chance they will end up misaligned when closed.
Kitless? No problem. You are in control of the threading.
Using a kit? I seem to remember thay the virage from berea used quad threading, but it's been a while since I've used that kit.
An alternative (but not a good one in my opinion) is to include some sort of a reference mark on the cap and body that indicated the required alignment before you start screwing the cap back on.
If you have to use triple thread, then make it 6 or 9 sided if you don't absolutely have to have an octagon.
Ed
carandacher
Member
Ed, I think single threaded tap would be OK to use in this case, however I am not completely understanding yet how I can ensure the alignment will be straight. The pen is a DIY silver pen.
Terredax, do you mean together opposing each other? I am not sure how it will ensure straight lines since there are two taps involved.
I am wondering since when the cap is closed, I can't control where the end of the thread is located, but perhaps I am missing something here as a newb.
Terredax, do you mean together opposing each other? I am not sure how it will ensure straight lines since there are two taps involved.
I am wondering since when the cap is closed, I can't control where the end of the thread is located, but perhaps I am missing something here as a newb.
dogcatcher
Member
Since I don't have your build process, here is what I did on a similar set up for a hexagon shape. I left both of the opposite ends open, screwed the 2 parts together and then cut the 6 flats and then finished the ends.
KLJ
Member
I put one together with everything pressed in place. Then screw the threaded parts together. Then line the blanks up as you want them to be. I then unscrew it and press the last section together. It might not hurt the threads to leave them screwed together but I have never chanced it. This way I know it will line up correct when it screws together and when it doesn't line up just unscrew it turn the cap back maybe quarter turn and screw it on again.
bmachin
Member
How do you plan on making your flats? If your barrel and cap are going to meet with a common diameter as shown in your picture. I might be inclined to screw them together firmly and do them all in one go. That way any difference in width will not be noticeable.
On the other hand you can adjust the alignment after the fact by trimming whatever you use as a stop for tightening the cap when you screw it on.
I've never done a pen like this, so take it for what it's worth. John Albert (Jalbert) has done several, so maybe he'll chime in.
Bill
On the other hand you can adjust the alignment after the fact by trimming whatever you use as a stop for tightening the cap when you screw it on.
I've never done a pen like this, so take it for what it's worth. John Albert (Jalbert) has done several, so maybe he'll chime in.
Bill
PenPal
Member
Pictures of answered pens would show clearly.
Peter.
Peter.
Ironwood
Member
From this I am assuming you are not using using any kit parts, but are making the parts and tapping the threads yourself.The pen is a DIY silver pen.
If so, and you already have the flat facets on the outside and can't put them on after the threading is done, just cut your threads. Now you just have to take a little bit off the end of the cap where it contacts the pen body to make the flats line up, little by little creep up on the perfect fit.
It might just take a wipe on 400 grit sandpaper each time to see it getting closer to lining up, depending on how hard your material is.
jalbert
Member
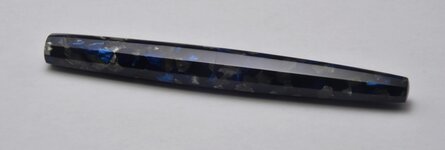
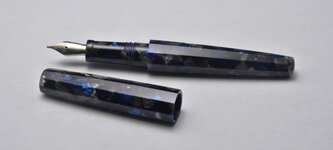
1. Cut cap threads in cap and on body
2. Shape section
3. Sand section and buff section/cap threads
4. Rough shape the pen
5. Screw cap and body together as they will be when the pen is finished.
6. Scribe facet lines in
7. Cut facets, sand facets, and buff pen
8. As someone said previously, lightly take material off the lip of cap if adjustments need to be made
Attachments
carandacher
Member
From this I am assuming you are not using using any kit parts, but are making the parts and tapping the threads yourself.The pen is a DIY silver pen.
If so, and you already have the flat facets on the outside and can't put them on after the threading is done, just cut your threads. Now you just have to take a little bit off the end of the cap where it contacts the pen body to make the flats line up, little by little creep up on the perfect fit.
It might just take a wipe on 400 grit sandpaper each time to see it getting closer to lining up, depending on how hard your material is.
Genial!
")