All to give away...!

Signed-In Members Don't See This Ad
Dave,

No flies here, mate...!

Are you asking me to make some of these blanks for you...????:wink::biggrin:

I may need to buy another pack of the craft foam as I can make a bigger mold with 7 pen blanks, I will need a full pack of foam for that but, it that is what you want, we can discuss that off the thread...!

If 7 are too many for you, maybe someone else here, would like to try a couple however, I should note that, these blanks are not for beginners, there are procedures that have to be put in place to deal with the rubberized nature of the foam, as the blank is worked on, very thin CA (5 cup) is the trick and then 10+ coats of CA take care of the foam strength...!

If I can make Resifills out of Cork, I and anyone else, can make them out of foam or rubber...!:wink::biggrin:

Cheers
George

Yeah that could be worth a try, I think I need to come visit you sometime and learn a little.
 
Signed-In Members Don't See This Ad
Well,
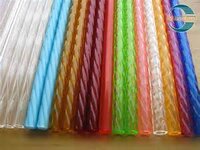
I seen acrylic tubes/rods looks like they mite be cut in small random pieces so they interlink. If you were to just stack tubes there would be a lot of empty space and a good way to trap air. I think a slightly died resin with some pearl mite do well.

color_acrylic_tubes-xl.jpg color_acrylic_rods.jpg

.
 
Here is another I just thought of. At a few shows I did in the past was at a parade and music concerts and they had these plastic necklaces for the kids. Another source and these glow in the dark.

GlowNecklaces.jpg


.
 
Drinking straws?

Sandy.

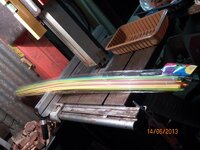
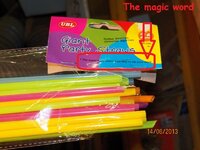
Congrats Sandy, your question is correct even though, these are long/party drinking straws...!

001.JPG 003.JPG


I had a feeling that, highlighting the length would throw some people out, it worked in part.

When I asked if they were alternatives, I was referring exactly to the type of tubing that Bruce embraced and share with us all so, thanks Bruce for completing part 2 of my question, and for that effort, I'm also awarding you with one box of the Olive root blanks so, congrats and thank you for playing the game so well...!

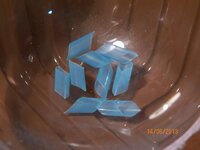
Responding to one of your questions Bruce about the way the material was cut, this is how all colours were cut, about 1/2" long or less, cut at about 60° 006.JPG

The dry molds were compacted slightly by putting the mold with the cut straws on top of the bandsaw table, while running. This was also done after the mixed resin was poured topping up as the resin filled all spaces, any small areas that air may have developed, that was all sorted when the pot was pressurised at 100PSI for an overnight "sleep". I believe though, the interlaced effects seen on my blank, have something to do with the semi transparent/translucent characteristics of these drinking straws, when embedded with resin.

I got the idea going on some very economical material to cast a pen blank with, now folks, will be your turn to try identical materials, such as all those that Bruce found, and many other that will be available, out there so, get casting/experimenting, that is good for the soul...!:wink::biggrin:


Well, is time to wrap up these questions groups and wait now, to start seeing some pens made with this Olive Root from the land of Oz and from George's lolly-shop...!

Thank you also to everyone that has been part of this interesting event, it was fun for me, I hope it was fun for you, any lessons learned in the way, well, they are just a great bonus...!:biggrin:

Sandy & Bruce, I will be sending a PM with some info, shortly...!

PS: Looking at some data referring to this thread, in the 2 weeks of its duration, we had about 30 pages, 285 replies and about 6.850 views, that's not bad for an old folk...!:)

Cheers
George
 
Last edited:
Thanks George this has been fun...

Kind of like a trivia contest....

I think something like this could be done more often and I bet it would get good participation even without gifts.

It's great for every one, opens up the mind, gives some fresh ideas, makes you dig and learn.

Thanks George

.
 
This was great. I followed it closely. Some definite outside the box thinking down under. I may have to go in my shop and see if I have any DIY rigs that could be a challenge. I doubt it though.
 
Not a problem peoples, I'm glad you enjoyed...!:biggrin:

Due to the fact that I'm no longer able to edit/update the front page/post #1 with all the winning list, I will updated it this way so that everyone can see it...!


UPDATE on "Giveaway" status;

*- Question - 1 (answered) Sully

*- Question - 2 (answered) Tim'sTurnings

*- Question - 3 (answered) DaveTTC

*- Question - 4 (answered) johncrane

*- Question - 5 (answered) teamtexas

*- Question - 6 (answered) TLTHW

*- Question - 7 (answered) jyreene

*- Question - 8 (answered) justturning

*- Question - 9 (answered) maxwell_smart007

*- Question - 10 (answered) Sandy


Any more...????, undetermined yet...!

Sorry folks, this is all...!:)

Cheers
George
 
George, I received my blanks today. They look great and I can't wait to give them a turn. I do have one question. I would like to fill some of the small voids with either a resin or powdered stone, but I'm not sure the best way to prepare the blank to remove the wax from inside the void, any suggestions? Thanks Dan
 
I got mine today also! Hope to get some time this weekend to turn. I might stop by hobby lobby to find some powdered something or other to fill them.

If it acts anything like when I drilled snakewood a little heat will get rid of the wax.
 
George, I received my blanks today. They look great and I can't wait to give them a turn. I do have one question. I would like to fill some of the small voids with either a resin or powdered stone, but I'm not sure the best way to prepare the blank to remove the wax from inside the void, any suggestions? Thanks Dan

The wax shouldn't be too deep, in fact, you don't have to do anything until you have then on the mandrel or TBC and get the wood right to the hand sanding stages. By them, 90% of some cracks or crevasses are gone.

If, there is anything that has to be filled, chances are, the wax never went that far, as I don't fully submerse the wood into the wax but simple touch each face of the blank on the hot wax, that normally allow the wood to show all its colours and grains, without contaminate the whole blank with wax.

There are 2 simple way to remove wax from wood, one is to boil water and as soon as the water reaches boiling, drop the blank into into for a couple of minutes, the hot water removes the wax and brings it to the water's surface so, I spoon or a paper towel should the use to "scoop" the wax out, otherwise, when you try to remove the wood from the boiling water, the wax gets stuck to the wood, again...!capich...???

If you think that the wood stayed in the boiling water for a little longer than it should have, to make sure the wood doesn't warp, you have to clamp it between 2 straight pieces of wood and put some weight on top of it, that will make sure the wood will stay straight while the wood cools down, that can take as little as 30 minutes, depending of your temps...!

The other method would be more applicable for when the blank is already half processed so, any smaller crevasses that you want to fill but are not sure if they have any wax or not, use a heat gun, a hair dryer or anything that can produce heat in a direction way and take it close to the crevasse/hole, for about 15 seconds on its hight heating set, you don't need to burn the wood, the wax will melt off the crevasse in no time.

If there is any doubt in your mind of any residue of wax still inside the crevasse/crack, simply put a drop of thin CA into it, unless the whole is too small, then I would put the thin CA on it and it can fill the whole and then you have no room to put the coloured filling.

For small fillings, I like to use medium to thick CA and some of the Pearlex powders used for casting, you can get any colours you like and here in Australia you can get the small sample Pearlex powders in 3gr containers, they are plentiful for fillings like this.

The use of stone crashed materials such as Turquoise, are also great and a better option for bigger fillings using epoxy however, even with different grades of crashing sometimes, it still a little too big size"particles" to be effective or useful, in very small holes/cracks...!

Too small whole or cracks are sometimes better filled with a matching material, and for that, you only have to get some saw dust from that blank or even small shavings and them mesh them out into dust and then use it.

One of the cheapest way to make shaving into small particles (almost dust) is by using one of those inexpensive coffee grinders, I have one that cost me $24 on eBay, but there are other methods to transform wood shavings into powder.

And this is when, my "old suggestion" tom every time you are going to work with a new wood, start with a clean lathe and lathe working area, get some plastic or glass containers and collect some dust or savings from that wood, put it in a bottle and write on it what it is. Do that to all woods you normally work with, what this do is, you are going to have a good collection of wood sawdust samples of all wood colours around, that is all you need to, and at any time to find one that is a matching wood or the closest colour to the one you need to do a matching fill.

This is useful for any kind of turnings you will ever do, from pens to bowls and anything in between...!

If I got you confused, let me know, any questions welcome, as always...!

Cheers
George
 
Back
Top Bottom