Segmented Arrows

Signed-In Members Don't See This Ad
See more from mark james

Signed-In Members Don't See This Ad

mark james

IAP Collection, Curator
Joined
Sep 6, 2012
Messages
12,750
Location
Medina, Ohio
Most of the process for those that want to try. :)
 

Attachments

  • IMG_0713.jpg
    IMG_0713.jpg
    218.2 KB · Views: 241
  • IMG_0717.jpg
    IMG_0717.jpg
    94.2 KB · Views: 203
  • IMG_0704.jpg
    IMG_0704.jpg
    168.1 KB · Views: 231
  • IMG_0718.jpg
    IMG_0718.jpg
    98.6 KB · Views: 210
  • IMG_0719.jpg
    IMG_0719.jpg
    106.6 KB · Views: 231
  • IMG_0720.jpg
    IMG_0720.jpg
    143.3 KB · Views: 212
  • IMG_0721.jpg
    IMG_0721.jpg
    134 KB · Views: 245
  • IMG_0722.jpg
    IMG_0722.jpg
    153.4 KB · Views: 191
  • IMG_0727.jpg
    IMG_0727.jpg
    157.8 KB · Views: 231
  • IMG_0728.jpg
    IMG_0728.jpg
    111.2 KB · Views: 212
  • IMG_0730.jpg
    IMG_0730.jpg
    106.4 KB · Views: 207
  • IMG_0732.jpg
    IMG_0732.jpg
    192.1 KB · Views: 240

mark james

IAP Collection, Curator
Joined
Sep 6, 2012
Messages
12,750
Location
Medina, Ohio
Beautiful job Mark. I love the arrows - that took some decent planning. Also, six??? That was gutsy! Looks like you aligned them pretty well.

There are close Steve. I was trying to get as small a spacer between the inlays as possible, but was not sure how close they would look. As you are aware, when the blank is 7/8" thick and aligned on the OD, we are unsure if the alignment at .55" will still be decent.

I'm not partial to arrows, but this is an element I wanted to work on (more severe angles, multiple pieces) and go back to some of the Frank Lloyd Wright stained glass concepts.
 

Attachments

  • Lilly+glass.jpg
    Lilly+glass.jpg
    284.7 KB · Views: 192
  • Katherine+Freeman+cabinets+'14.jpg
    Katherine+Freeman+cabinets+'14.jpg
    276.1 KB · Views: 177
  • Berstein+panel.jpg
    Berstein+panel.jpg
    227.8 KB · Views: 188

SteveJ

Member
Joined
Jul 11, 2012
Messages
3,374
Location
Grand Junction, Colorado
Thanks for the pictures - I like how you used the disk sander to create the points. Going with the thinner arrows made the six possible. When I did five thicker ones the channels were so thin you could see light through them where the channels met.

I see you got the sliding table, are you glad you got it?
 

SteveAxelrod

Member
Joined
Nov 11, 2015
Messages
640
Location
Oldsmar, Florida
Beautiful segmenting Mark! I turn pens for the immediate gratification. Segmenting is one niche that is not in the cards for me, but I certainly enjoy seeing your fine craftsmanship!
 

mark james

IAP Collection, Curator
Joined
Sep 6, 2012
Messages
12,750
Location
Medina, Ohio
Thanks for the pictures - I like how you used the disk sander to create the points. Going with the thinner arrows made the six possible. When I did five thicker ones the channels were so thin you could see light through them where the channels met.

I see you got the sliding table, are you glad you got it?

Yes, I am. I tried to make my own, and just was not happy with my attempt. The sled is expensive though. There are some issues, so using it will identify what jigs still are needed.

I made a few angled plates that allow me more angles. The way it is constructed, the adjustable bar on the left only extends to 45 degrees (I think).

I used an adjustable T square to get my right side (thickness of the slices) set, and it worked fine for repeatable cuts. I then added the blue tape as a simple zero tolerance. Before the blue tape, even though the slots in the sled are thin, my slices kept getting sucked into the slot, or shattered. The tape has eliminated that problem.

In the first picture you can see the T bar on the right edge. In the second picture the picture is from the back of the table saw so you can how I used the tape; not fancy, but took me about 10 seconds.
 

Attachments

  • IMG_0698.jpg
    IMG_0698.jpg
    154.5 KB · Views: 187
  • IMG_0706.jpg
    IMG_0706.jpg
    135.7 KB · Views: 171

Pierre---

Member
Joined
Jun 10, 2012
Messages
415
Location
France
Thanks for the pics and for showing this beautiful pen, Mark.

If you want C&cs, I would say I admire the segmenting and precision, but I am not convinced by the red wood at the point : using the same white wood would have showed the point off.

The same for the other extremity, where the feathers are cut straight instead of V-cut. But well, maybe it was not the easiest part to glue...:biggrin:
 

Dale Parrott

Member
Joined
Feb 22, 2012
Messages
286
Location
Goshen, Indiana
Thank you Mark for showing us this new design and sharing how you made it. There is one process that I'm not clear on and that is making the grooves in the blank. I can think of a couple different ways but not sure my fingers would survive. Would you be willing to post a photo or 2 of your setup for this. If this has already been discussed just point me to the older thread. Great craftsmanship on this pen!
Dale
 

mark james

IAP Collection, Curator
Joined
Sep 6, 2012
Messages
12,750
Location
Medina, Ohio
Thank you Mark for showing us this new design and sharing how you made it. There is one process that I'm not clear on and that is making the grooves in the blank. I can think of a couple different ways but not sure my fingers would survive. Would you be willing to post a photo or 2 of your setup for this. If this has already been discussed just point me to the older thread. Great craftsmanship on this pen!
Dale

No problem Dale, I'll get some of the past links and some photos. For what its worth - I hope others (such as you have already have done) take anything I post as a spark of interest to have fun and teach me a few things. This is simply enjoyment for me - if others can use/develop it for their enjoyment/purposes - wonderful!

I will be stealing (with credit) your middle square section concept. I love that element, just need to figure out how to get it into "my technique" of slots close to .2" wide.
 

JohnU

Member
Joined
Jan 31, 2008
Messages
4,951
Location
Ottawa, Illinois
I love it! I'm so glad you did this. I thought of arrows when I seen your demo pen in Chicago and wanted to try but I don't think I have the best tools for that job. Coming from a family of traditional bow hunters I love this idea and I'm very happy to see you pulled it off. Not at all surprised with Your eye for detail and skill level. Still very happy to see the final master piece. As always, thanks for sharing Mark! Can't wait to see what's next.
 

mark james

IAP Collection, Curator
Joined
Sep 6, 2012
Messages
12,750
Location
Medina, Ohio
There is one process that I'm not clear on and that is making the grooves in the blank. I can think of a couple different ways but not sure my fingers would survive. Would you be willing to post a photo or 2 of your setup for this.
Dale

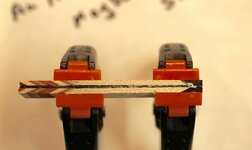
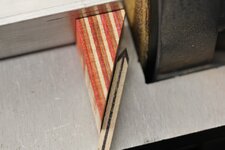
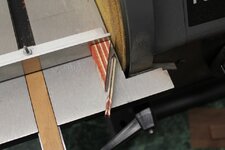
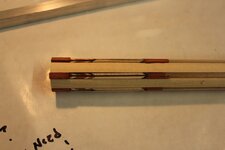
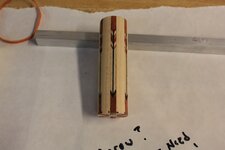
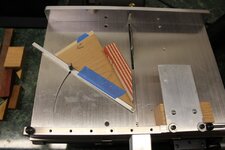
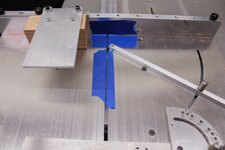
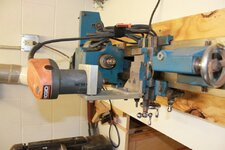
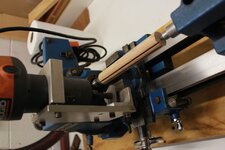
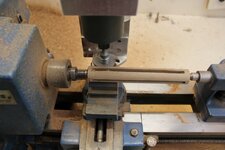
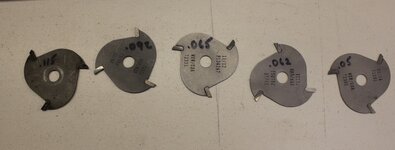
These are slots made with a trim router and a slitting blade. This is a previous thread that has some discussion and pictures.

http://www.penturners.org/forum/f179/billet-rings-145603/

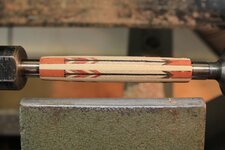
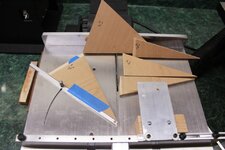
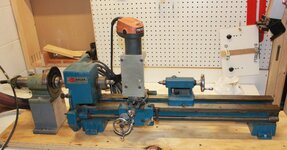
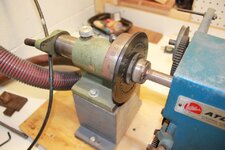
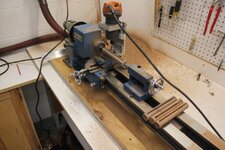
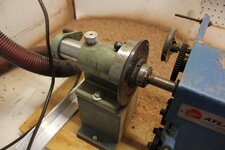
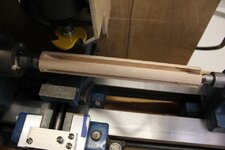
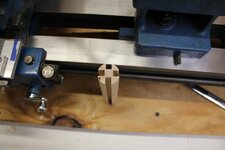
Basically, I have a 1950's vintage Atlas Clausing Metal Lathe, motor was tore out ages ago. BUT, it has a 360 degree indexing plate welded to the headstock, and a mounting for a trim router that I have readapted for my purposes. The only purpose in life for this hunk of metal is to hold material between centers, cut slots in as many combinations as I can imagine.

I have been using different slitting blades from: Wisconsin Knife Works.

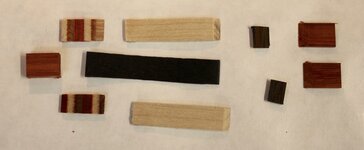
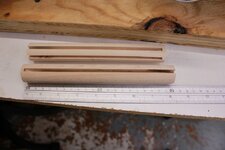
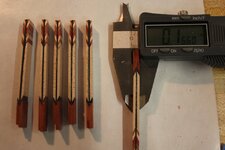
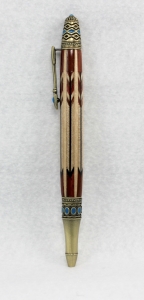
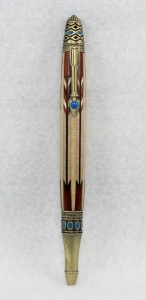
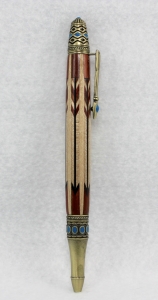
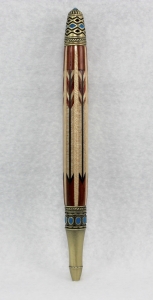
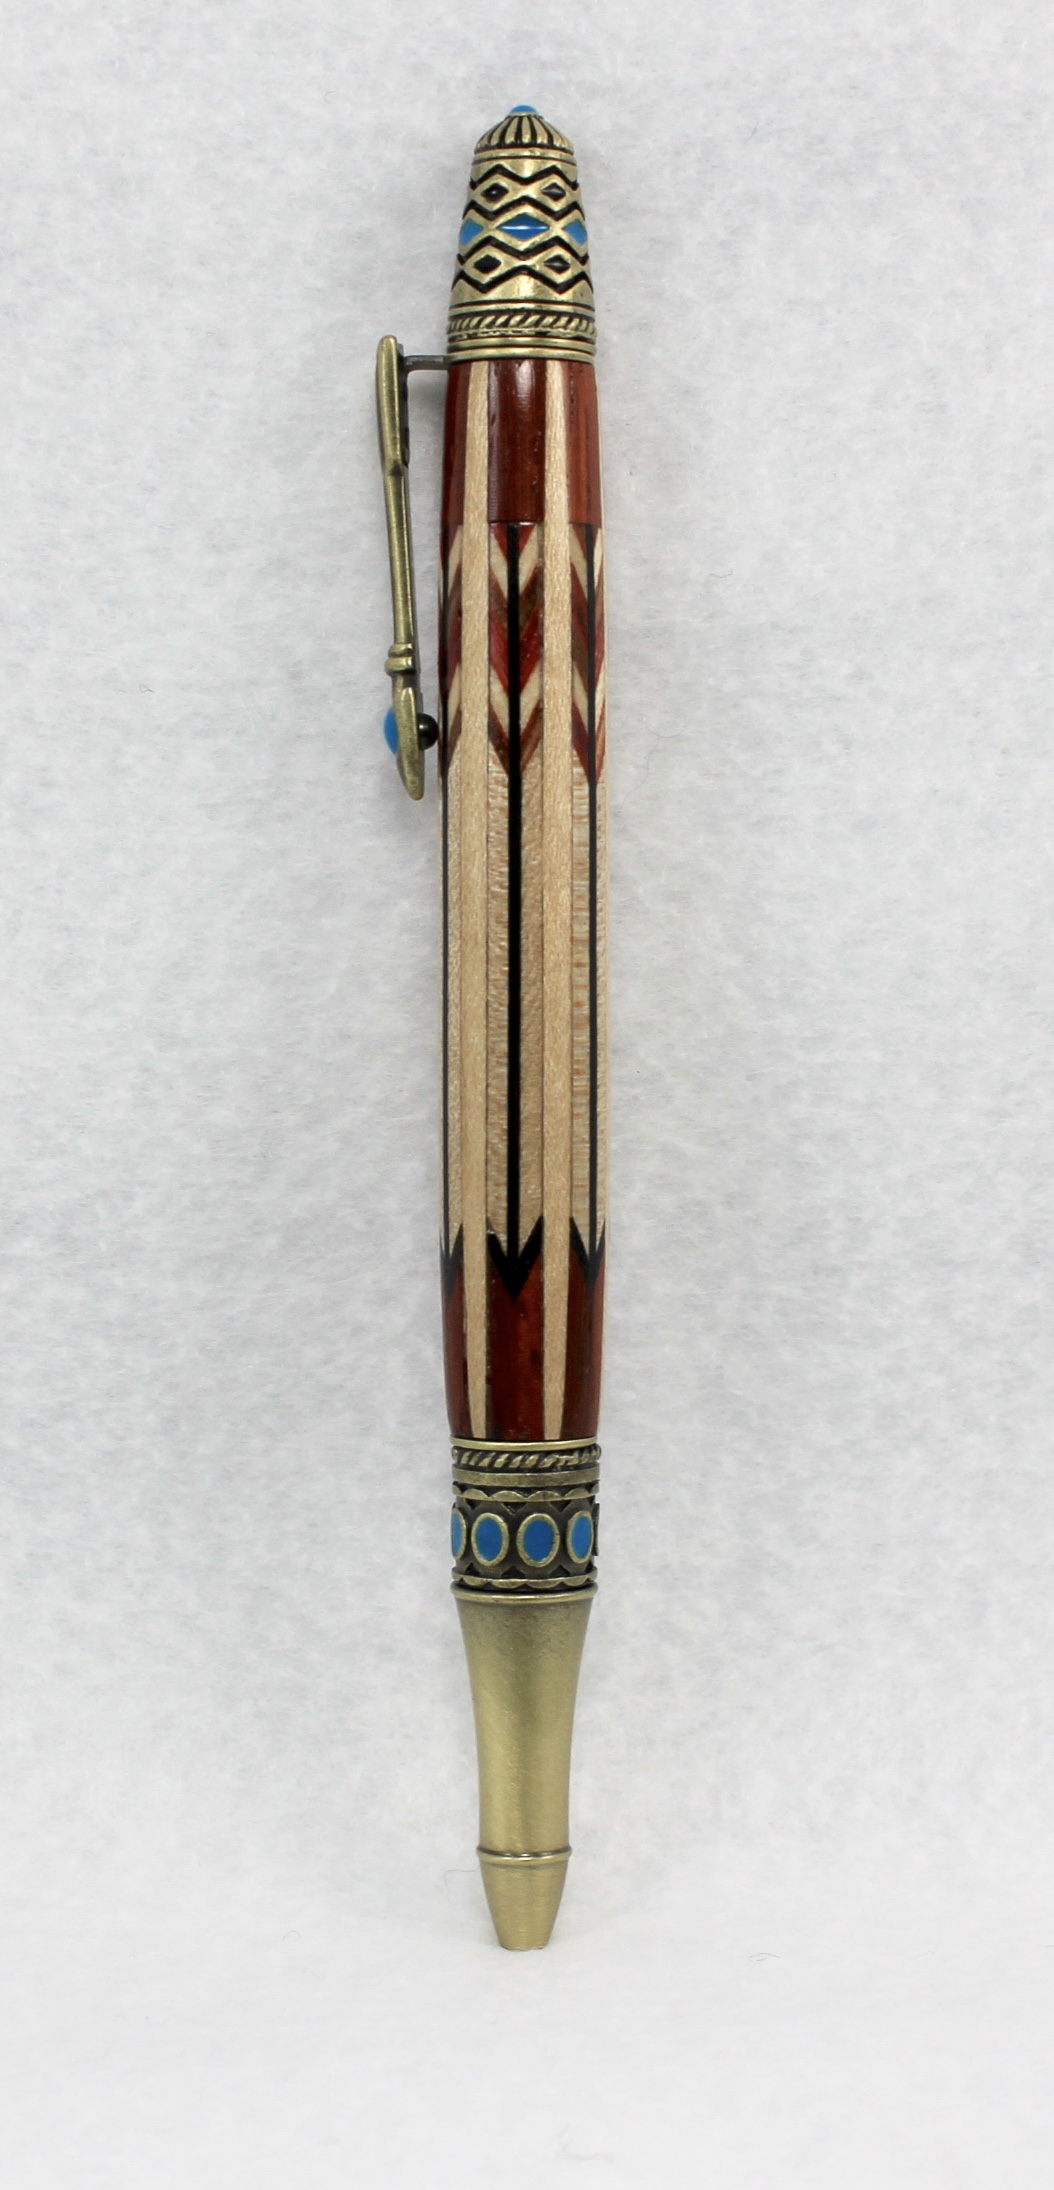
Basically, I can cut slots in 1" Hard Maple dowels (or any base material), any dimension wide (.06", .0625", .070" , etc...) to whatever depth I want, in any combination of numbers per dowel (I have done 3, 4, 5, 6, 7, 8, 9, 12). The higher I go, the less material I have at depth (sometimes none).

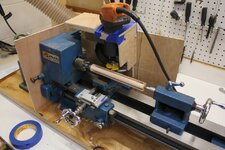
The machine is named "Frankie" and it has earned it's keep!

Ask any questions! (Oh, If you want some slotted blanks to play with via "my technique" - send me a PM - and anyone else who may read this. Some folks cuts staves (pie shaped long segments), I cut straight bottom slots. No worries for my fingers - this is why I have no problem making "starting blanks" for others).
 

Attachments

  • IMG_3098.jpg
    IMG_3098.jpg
    177 KB · Views: 144
  • IMG_3099.jpg
    IMG_3099.jpg
    173.2 KB · Views: 131
  • IMG_3100.jpg
    IMG_3100.jpg
    169.1 KB · Views: 130
  • IMG_3101.jpg
    IMG_3101.jpg
    147.8 KB · Views: 147
  • IMG_3424.jpg
    IMG_3424.jpg
    218.7 KB · Views: 141
  • IMG_3425.jpg
    IMG_3425.jpg
    174.2 KB · Views: 131
  • IMG_3426.jpg
    IMG_3426.jpg
    172.7 KB · Views: 140
  • IMG_0505.jpg
    IMG_0505.jpg
    212 KB · Views: 136
  • IMG_0504.jpg
    IMG_0504.jpg
    138.1 KB · Views: 128
  • IMG_0506.jpg
    IMG_0506.jpg
    129 KB · Views: 143
  • IMG_3493.jpg
    IMG_3493.jpg
    113.7 KB · Views: 122

mark james

IAP Collection, Curator
Joined
Sep 6, 2012
Messages
12,750
Location
Medina, Ohio
Thanks for the pics and for showing this beautiful pen, Mark.

If you want C&cs, I would say I admire the segmenting and precision, but I am not convinced by the red wood at the point : using the same white wood would have showed the point off.

The same for the other extremity, where the feathers are cut straight instead of V-cut. But well, maybe it was not the easiest part to glue...:biggrin:

You are correct on both points Pierre! A more vibrant color would have worked better. The arrow points are wenge, so they are blackish, and in person fairly distinct, but I agree that a different color (which I have) of veneer would highlight the divisions better.

Thanks for the tips - will only help next time.
 

SteveJ

Member
Joined
Jul 11, 2012
Messages
3,374
Location
Grand Junction, Colorado
Are you using pre-turned hardwood dowels? That is a great idea - I've been turning pen blanks down which doesn't give me much room for the grooves with the set-up I've been using. Thanks for the pics, it will improve my methods.
 

mark james

IAP Collection, Curator
Joined
Sep 6, 2012
Messages
12,750
Location
Medina, Ohio

dogcatcher

Member
Joined
Jul 4, 2007
Messages
2,361
Location
TX, NM or on the road
Outstanding job, thanks for sharing your processes.

I have that same Atlas Clausing lathe, except mine is the metric version. Ran out of room and put it in storage about 12 years ago. Almost tempted to get it out pf storage, but my Taig does my work for now.
 

mark james

IAP Collection, Curator
Joined
Sep 6, 2012
Messages
12,750
Location
Medina, Ohio
Bump for Keith

Keith, this is the thread I was mentioning.

Cut your slices at a more severe angle, thinner, thinner veneers, and you're good to go. I'll also suggest constructing a 5, 6 ,7 inlay vs your 4. The arrows will be much closer. But that may not be what you want.

Good luck.

Several other threads: http://www.penturners.org/forum/f13/mismatched-chevrons-154066/. http://www.penturners.org/forum/f13/pen-153810/. http://www.penturners.org/forum/f13/20-piece-segmented-chevron-finial-150146/
 
Last edited:
Top Bottom